Blog to Book Project — Write a Series

Amazon has made it much easier to compile your series. Before, you would have to edit each book, adding series information. Now, if you hadn’t intended to write a series but ended up writing one (which happened to me), then you can set them up so they are all together so that your loyal readers will be aware there is more for them to enjoy.

When you go to your KDP bookshelf, you’ll see a new series section. Click to create a new series. You’ll be taken to the series setup page. Choose the language your books are written in. Then create a series title. All the books in the series will have the same series title, although each one has its own book title. 

So if I name my series “A Woman’s Guide to Living in Mexico” then that’s the heading the book series will be found under. The individual books retain their titles. Thus, A Woman’s Guide to Holidays in Mexico is a book in the A Woman’s Guide to Living in Mexico series. The series can be ordered, written to be read in a certain order, or unordered. An unordered series can be read in any order. 

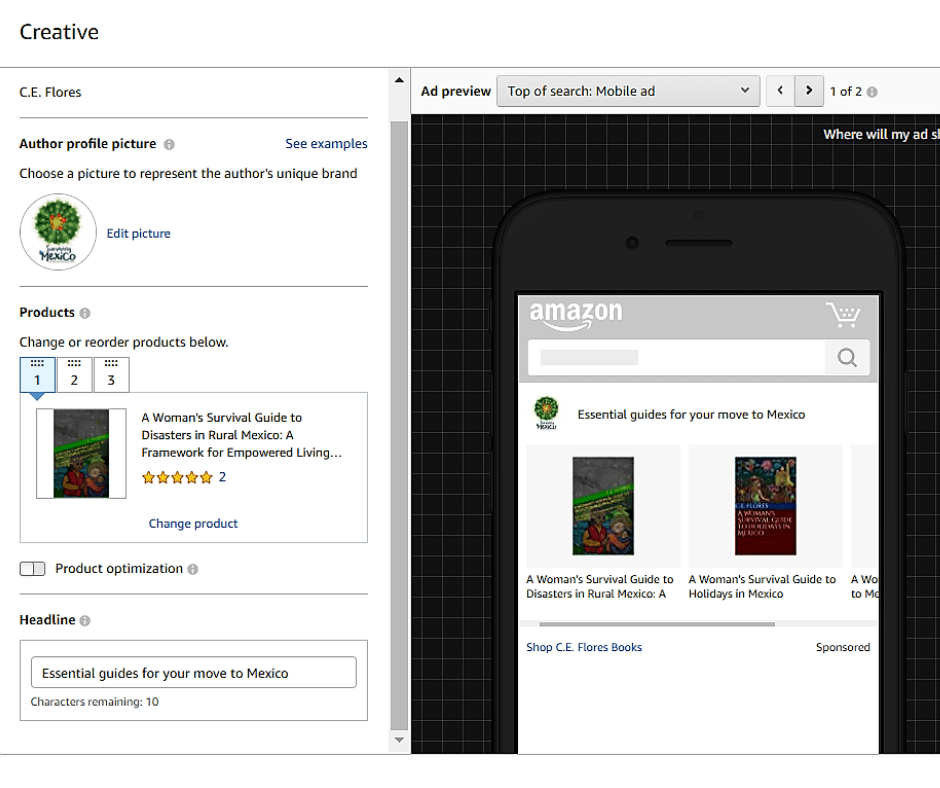
Amazon will compile an image for your series using the covers of the first three books. Next, you’ll be asked to write a description. For a better visual experience, use HTML codes for line breaks, bold, italics, and so on. If you don’t write a description, the book description from the first book in the series will be displayed. 

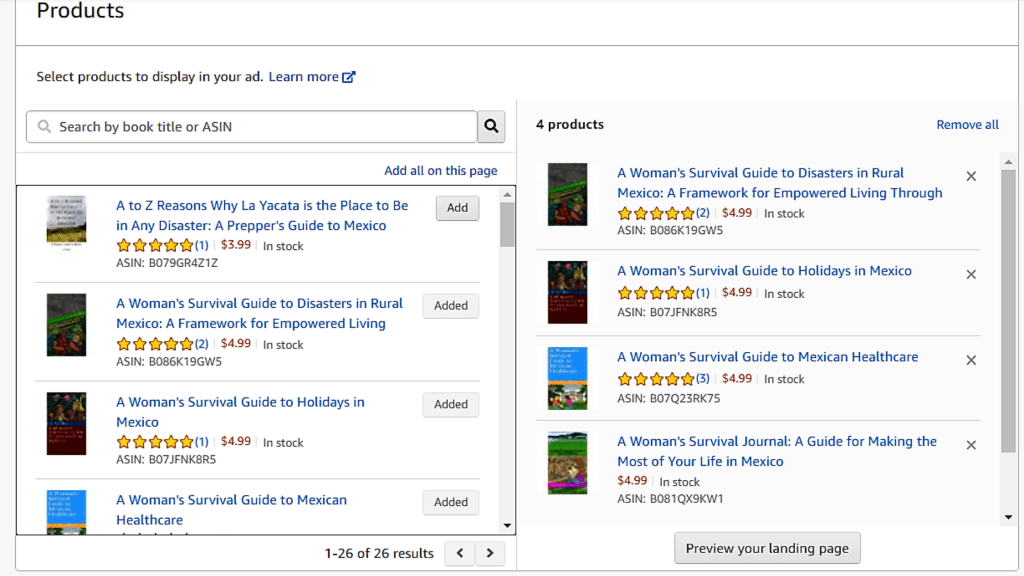
After you “Submit updates,” you’ll be given a chance to add books to the series. Since I am compiling a series from books I have already published, I choose the +Add existing title button. If I were adding a new book to a series that has not been published, I would choose +Create new title. A popup will appear with all your published books. When you pick one, you’ll be asked how the book relates to the series. It can be classified as main or related content. The main content includes the books in the series. Related content might be novellas, prequels, or short stories related to the series. Right now, related content won’t appear on your Amazon listing for the series, but that feature is being developed. 

You’ll then be asked to confirm the inclusion of the book in the series. Amazon will then review the series and if approved, you’ll have a series page within 72 hours. 

If you write a book and want to add it to a series, you can do that from your KDP bookshelf as well. The three ellipses to the far right of the listing will now show “Add to series” as an option. 

When the series is live, you’ll be able to manage it from your KDP bookshelf. You can edit the details, add existing or new titles, remove a book, edit book order, change whether books are main or related content, or delete the series. 

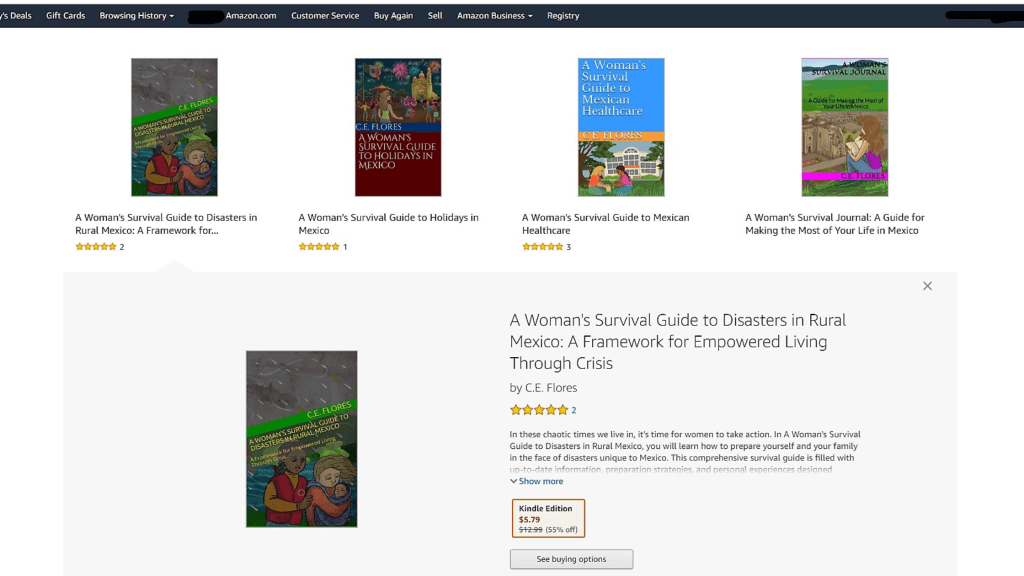
Once a book has been added to a series, the listing on your KDP bookshelf will reflect that and it will appear on each of the individual book listings on Amazon. There will also be a series page that readers can access by clicking on the series image on the book listing.

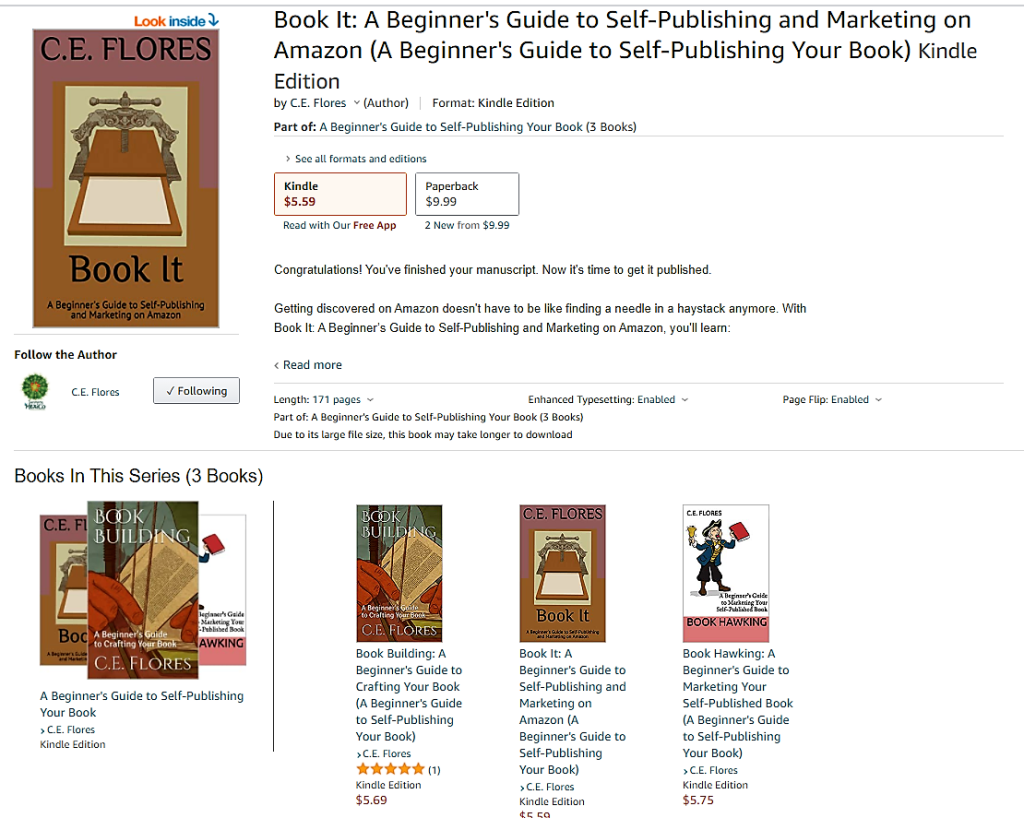
The series page shows your series description and lists the books. Readers can buy the books individually or bulk buy using 1-click ordering. The series page can be seen on the Amazon US, UK, and Germany websites, apps, e-readers, and Fire tablets.

Having a bonafide series is a great way to cross-promote your books. The more, the merrier as they say!

Assignment: Compile a book series from your books. 

Blog to Book Project — Amazon Sponsored Brands

In 2020, Amazon opened up the world of sponsored brands to authors. Using this feature, authors can feature up to five similar books in a cost-per-click (CPC) ad. If a viewer clicks on the ad, they will be taken to a custom landing page. Currently, this is only open to U.S. authors, but eventually, I’m sure it will be available to authors in other countries that Amazon services.

From your KDP bookshelf, choose Promote and Advertise. Then choose the Amazon.com marketplace under Run an Ad Campaign. To begin, choose Sponsored Brands from the campaign types.

You’ll need to add a credit card to launch the campaign, otherwise you can save it as a draft. Create a campaign name, something memorable such as Survival Guide Ad or Writers Books Ad. Next choose a start and end date. Set your budget. A lifetime budget is only available for ads with an end date. If you have used more than one pen name, you’ll be able to choose here which one you would like to highlight in the ad as well. 

Next you’ll choose the books you’d like to highlight with this ad campaign. You can choose books in the same series or books that are written in the same genre.

You’ll have a chance to review how the custom landing page will look. Your books will be listed across the top, and one listing will be expanded below them. 

If you aren’t happy with the book order, you can change that in the next section Creative. Add an author photo or your brand logo if you have one. The image should be at least 300 x 300 pixels and smaller than 1 MB. Use PNG, JPEG or GIF. The toggle Product Optimization lets Amazon automatically replace the books you’ve selected with different ones if they are more relevant to a user’s search. Create a headline that summarizes what you are presenting like Guides to make your move to Mexico easier or Aids designed to help you format your book today. Amazon suggests using sentence case rather than all capital letters and avoiding extra punctuation like !!!!.

You can choose from Keyword or Product targeting, whichever you believe will best get your books in front of your target audience. You can also add negative keywords or products to exclude irrelevant terms. 

Finally, if you’ve already entered the billing information, then you can submit everything for review. 

Assignment: Create a Sponsored Brand ad campaign. 

***

Thoughts on Proofreading After A Disappointing Reading Experience

Recently I excitedly purchased the third book in a series I was enjoying. It cost twice the first and second book, but I figured, why not? I started in, anxious to see what would happen next and found a typo. I know that sometimes that happens, so I “Reported Content Error” on my Kindle and continued. Then there was another error. Hmm. After the fourth error on the same page, I stopped editing. I wasn’t enjoying the book. The errors were not just small things, but missing text, incorrect words, limp biscuit punctuation and so on. It was like it was transcribed from a muffled recording. 

That got me thinking. Perhaps the author did use a voice to text program. I’ve seen programs like Dragon Speech Recognition Solutions touted as life-savers in different writing groups. Without asking, I don’t know what this particular author used to create her book, but it got to the point when the errors interfered so much with my enjoyment that I abandoned it. 

I started reflecting on my own books then. I admit to being somewhat of a perfectionist when it comes to punctuation and grammar. Plus, I use Grammarly as a general spellchecker. I’ve also started using Hemingway a bit more when I have to pay attention to how difficult my sentences are structure-wise, like in a writing assignment for the online ESL platform I work for. I’d never turn in an article for my content writing client without checking it thoroughly. And yet, there’s the general consensus that ok is good enough when it comes to self-published books. 

I know that I’ve found typos and awkwardly worded sentences in my own writing after publishing. And I go back and forth as to whether I’m being too critical as a reader when I focus on these errors. But, I fully believe that if we, as writers, can do better, we should and not just be content with just ok. 

So when I find those typos that managed to slip past Grammarly and my own proofreading sessions, I make the changes. When I have discovered and fixed enough of them, I upload a new version of my book to the publishing platform. Should I judge this author for not giving me the quality of book I felt I deserved? The jury’s still out on that.  

What do you do to make sure your writing is the best it can be?

***

Has formatting your book turned into a nightmare? Fear not! The mystery of book organization is a thing of the past with Book Building: A Beginner’s Guide to Crafting Your Book.

Blog to Book Project–Advanced Reader’s/Reviewer’s Copies (ARC)

ARC stands for Advanced Reader’s (or Reviewer’s) Copy. It’s a copy of your book that you give to someone before your official book launch. The idea is for these reviewers or Beta readers to have access to your writing so that you can gather testimonials, feedback, and even reviews before your book is published.

So how do you get an ARC copy if your book isn’t published yet? Well, it depends on the publishing platform you are using and the formatting template you chose.

proof

Amazon allows you to order a publisher’s proof before your print book goes live so that you can check for formatting errors. The publisher’s proof is exactly how your book will look once it’s released, provided you don’t make any changes, except there is a message on the cover that states it is a proof and not for resale. As an author, you can purchase up to five copies at a time. You’ll be able to send these as gifts to Beta readers, reviewers, or book bloggers.

Screenshot (574)

If you are using Pressbooks as your book formatting template, you have a few digital options. You can download your book in PDF, EPUB, or MOBI format to your computer and then just send the file via email. You can also provide the link to your webbook. The address of your webbook is what you see when you click on “Visit Book.”

If you are using Microsoft Word, you can also download a .docx or PDF version you can send to reviewers. Honestly, these are my least favorite format to receive when reading books. When I can, I take the time to use a converter to change the file to MOBI for easier reading on my Kindle. I use Zamzar, which is free online.

You could also publish your book but not publicize the fact. This technique is known as a soft launch. You can gift books to reviewers, or set up a free promotion so that readers can get a copy without buying it just yet. Remember, though, for the review to carry weight with Amazon, it needs to be a verified purchase.

So, another way to provide the book at a discounted is to set the price at $0.99 during the time you are looking for reviews. Then when you are ready for your official book launch, change the price to what you usually would be asking for your book. That way, those reviewers you purchased your book at $0.99 will be able to publish a verified review.

When sending out your advanced reviewer’s copies, be sure to ask what format the reader would like to receive their copy of the book. Also, be sure to include launch day information, so readers have an idea of how long they have to read the book, and any testimonials and reviews will be ready before then. A reviewer should always disclose the fact that he or she received an ARC in their review.

Remember, you can’t force someone to leave a review even if you have given your book away for free. A few reminder emails are ok but don’t start badgering people. Nor can you control what a person might write in a review. You may get some bad reviews. Decide if what the person says is valid or not, then either do some editing or let it go.

Assignment: Decide how you will distribute your ARC.

***

ebook cover
Click on the image for a preview!

Blog to Book Project — Blog Tours

authorcopies

A traditional book tour is when an author takes his or her book on the road stopping at bookstores, coffee shops, and libraries to do presentations or book signings.  A blog tour involves your book being featured on different blogs and websites over a specific time period. The dates are set in advance like a book tour, and each article or post is unique to the site or blog hosting it.  A related idea is the blog blitz. This is when your book is featured on different blogs or websites, but on the same day.

Book bloggers are an excellent choice to include in your blog tour. Reedsy has a large list of book bloggers you can find here. Other places you might consider are websites that are in your niche. For instance, if you write about health topics, perhaps a health blogger would be interested in featuring your book.

You can provide an ARC (advanced review copy) to bloggers and website owners that would like to review your book. You also could provide promotional information or an exclusive excerpt for those that don’t have time to read it before your launch date. Don’t forget about podcasts, giveaways, or author interviews as potential promotional material for your blog tour.

You should organize your blog tour about six weeks before your book launch so that bloggers and web site owners have time to schedule your feature post during the time immediately before and after your launch.  Make sure to include how readers can purchase your book as well as sharing the post on your social media channels. Take the time to visit and comment on the blog or website that is hosting your blog tour that day.

Assignment: Plan a blog tour.

***

ebook cover
Click on the image for a preview!

Blog to Book Project — Six-Month Book Launch Timeline

19

After you’ve finished your book, done extensive proofreading, had another set of eyes look at it for editing issues, and check your formatting, you should organize your book launch. In this chapter, you’ll find a six-month book launch (six months before and six months after), but you can adapt the timing and suggested marketing to fit your needs.

Before your book launch, you should have your Author Website, Facebook Author Page, Twitter, and Pinterest accounts already set up and be sharing interesting non-launch information regularly. If not, time to get on the stick about it. Continue sharing value-filled content during the entire launch period, with sporadic promotional posts.

Six Months Before Launch

  • Post a cover reveal across your social media sites.
  • Conversely, if you haven’t decided on a final cover design yet, you can poll your followers. Ask them which design do they prefer and why.

Five Months Before Launch

  • Add your book blurb to your Author Website and share it on your social media channels.
  • If you’ve already uploaded your manuscript to the publishing platform of your choice, make it available for pre-order.

Four Months Before Launch

  • Spark some interest in your newsletter.
  • Offer an incentive for readers to opt-in. You could send them a sample chapter, a character description quiz, a useful checklist based on your upcoming book’s topic, set up a challenge for your readers, or offer exclusive content in the form of a webinar or audio file.
  • Make sure to include a reference to your soon-to-be-released book someplace in the newsletter and on the opt-in page.
  • Share the opt-in lead magnet on your social media networks.

Three Months Before Launch

  • Update your author profiles on all your social media platforms. Include information about pre-ordering your book.
  • Continue providing content through your newsletter and Author Website.
  • Share a glimpse of your author’s life while you were writing the book.
  • Talk about the inspiration behind the book.

Two Months Before Launch

  • Create some marketing images. Use images from your book or your book cover. Add quotes from the book, author quotes, or testimonials from others if you have them.
  • Remember to provide a way for readers to pre-order your book as you post them on social media.
  • Send out the call for ARC (Advanced Review Copy) readers. Get your book into their hands as soon as possible.
  • Contact Book Bloggers to see if they would be interested in an ARC to review on their blogs.

One Month Before Launch

  • Create some countdown social posts using Canva. One month, one week, x days until the launch.
  • Share your book trailer.
  • Post an excerpt or first chapter on your Author Website. Generate some anticipation.
  • Create a Pinterest board about the book. Think outside the box here. If you are writing historical fiction, pin relevant facts, locations, even period furniture. If your book is non-fiction, pin articles you used in your research.
  • Begin your book blog tour.

Launch Day

  • Send out a launch day newsletter.
  • Post “Launching Today” posts across your social media networks.
  • Update your social media headers to highlight your book.
  • Email your ARC and Beta readers letting them know the book is ready for verified reviews.
  • Hold a launch party. Broadcast snippets live or share them afterward.
  • Post public thank you for event coordinators and share pictures of you and your book enjoying the party.

One Month After Launch

  • Continue your book blog tour.
  • Contact other authors to do some cross-promoting.
  • Keep posting to your Author Website.
  • Set up a live Q & A session on Facebook or Twitter.

Two Months After Launch

  • Take your book on the road.
  • Do book signings at local bookstores.
  • Talk to libraries about getting your book on the shelf.

Three Months After Launch

Four Months After Launch

  • Publicly thank readers who provide feedback or leave a review.
  • Find an organization that relates to your book topic and see if it would be interested in having you speak at an upcoming event.

Five Months After Launch

  • Make recommended reading lists on Goodreads or your Author Website that include your book.
  • Keep publishing engaging content on your Author Website.

Six Months After Launch

  • Release the print or audio version of your book. Use the new format to do another mini-launch.
  • Start generating interest in your next book.

You might not want to include all of these suggestions, but the more publicity there is about your book, the more likely you’ll sell some copies of it. So try to complete as many as possible, as often as possible without being spammy.

Assignment: Plan your book launch.

***

Click on the image for a preview!

Blog to Book Project — Improving Your Chances of Becoming an Amazon Best Seller

resized_bestsellerEveryone wants to be the author of a best seller. Once you have that moniker, chances are you’ll sell more books because people are drawn to success. You might also have more opportunities to promote your business, speak as an authority at functions, and make more money. It’s a status thing. 

Becoming a best-selling author on Amazon isn’t always easy, but there are a few things you can do to increase the odds in your favor.

Bestseller status is calculated by Amazon with actual book sales. A book that successfully reaches #1 has recently sold more than any other book in that category. Sales aren’t consistent across Amazon sites. Therefore, if your book is selling well in the U.K., it might not meet the count to become a U.S. bestseller. 

Amazon’s bestseller algorithm has a predictive component. So a sudden spike in sales might not be enough to launch your book among the stars. You’ll have more success with a sustained period of high sales. 

You can increase your chances of hitting that bestseller mark by taking a serious look at your:

  • Categories
  • Keywords
  • Cover
  • Title and subtitle
  • Blurb
  • Reviews
  • Introduction

categories

Categories

When you uploaded your book, you had the option to choose two categories that you felt best represented the theme of your work. What you might not know is that you can request up to eight more categories, as long as you can justify your book being classified in that way. All you need to do is contact the KDP people (http://www.kdp.amazon.com/contact-us) with that request.

You should research your category choices carefully. Sometimes, the same categories are not available for print books as they are for Kindle books. Ideally, to improve your chances of best-seller status, you should look for categories that don’t have a lot of competition but still fit your book’s theme.

You can see all the current categories for Kindle books here and for print books here.

Keywords

If you want the right readers to find your book, keywords are another important aspect. You’ll have the option to include up to seven keywords when you upload your manuscript. Don’t be afraid to use phrases instead of single words here. For example, “How to retire in Mexico” is probably more searchable then just “retirement.”

Make sure your keywords don’t violate Amazon’s policies. The key is to think like a reader. If you were searching for your book, what phrases would you use? Do some searching on Amazon and see what results you get.  

Cover

A picture is worth a thousand words. Make sure your cover is eye-catching and representative of your book. 

Title and Subtitle

An interesting title and subtitle that hints at what readers will find inside, or outright tell them, will improve sales.

Book Blurb

The book description is key to convincing readers who are on the fence about your book. Make sure your book blurb shines.

Book Reviews

Readers give often quite a bit of credence to the opinion of others when it comes to their book selections. Work on getting quality book reviews.

Attention-Grabbing Introduction

With the Look Inside option, you have the chance to dazzle your potential reader with your prose. Don’t waste this opportunity with acknowledgments or other items that can be moved to the back matter.

Once you’ve tweaked these factors to optimize your chances, then the best thing you can do to reach bestseller stardom is to write a great book and market the heck out of it. 

Assignment: Optimize your book for bestseller status.

***

book it book cover

Blog to Book Project — Using a Book Trailer to Market Your Self-Published Book

There’s no question that people are watching more videos these days. One billion hours of YouTube videos are watched per day. YouTube is the second most popular site on the internet these days (right after Google).

Facebook video is another up and coming option you should be aware of. Statistics show that 11 percent of all Facebook posts are videos and this platform generates 8 billion video views per day.

You can capitalize on all those video hours by creating your own book trailer. It’s a little out of the norm and will get more attention than a traditional book review or social media advertisement.

Now, the thing with a book trailer is you want it to be knock-their-socks-off good. If friends and family cringe when they watch it, well, perhaps it won’t be as successful as you’d like it to be. On the other hand, a professional and interesting book trailer demonstrates that you are a good storyteller across mediums, and prompts more interest in your book.

So here are some tips when designing a riveting book trailer.

  • Think about your typical reader and adapt the trailer to appeal to them specifically. If your book is a romance, then make your trailer romantic. If it is a mystery, then create a suspenseful trailer.
  • Hook your reader with a compelling video, not a summary of your book. You could focus on the problem the character in your book faces or the solution your non-fiction book provides the reader.
  • Keep it short. Aim for at least 30 seconds, but less than 2 minutes.
  • Use professional photos and graphics. There’s a lot of competition out there and you want your book trailer to stand out. Make sure to get permission to use images that are not your own.
  • Consider hiring an expert. Making a quality video, even a short one, incorporates many technical skills. If you aren’t skilled in video production, find someone to help you. Animated videos especially need the expertise of professionals.
  • If your book is nonfiction you could create an author video that demonstrates your expertise on the subject of your book. Consider your personal appearance if you do. Pay attention to what you are wearing, the background, and how well you articulate your words.
  • If you want to enact a scene from your book with real people, get actors to play the parts. Visit your local theater or advertise online. A professional voice actor is another possible way to get just the right tone for your book trailer.
  • Background music is a way to make text and images more memorable. Be sure to get permission to include it or use royalty-free music.
  • Make sure to include a call to action at the end of the trailer. Tell the viewer where your book is available for purchase.
  • Share the video everywhere! Add it to your author website, share it on social media, and upload it to YouTube. The more you share it, the more chance you’ll have to get the attention of potential readers.

There are several free or low-cost sites that can help you create a book trailer. Windows users can download Movie Maker or Photo Story. Mac computers have iMovie software already installed. You can use Powerpoint to create a presentation then export it as a video. Prezi also has a free version.

Assignment: Create a book trailer.

****

Click on the image for a preview!

Blog to Book Project — Types of Publishing

You may not be totally convinced that self-publishing is for you, and that’s ok. You have options. There are three main routes to publishing these days, traditional, self, and hybrid. Let’s take a few minutes to highlight the pros and cons of each.

Traditional Publishing

Traditional publishing refers to the process of being given a book deal by a publishing company. It typically involves submitting your manuscript to a number of agents or publishers and quite a few rejection letters. Once your book has been accepted, a contract is drawn up and signed by the author, the publisher, and the agent. A manuscript will go through several more rounds of editing before it is published. 

Some big-name publishing houses are Macmillan, HarperCollins, Penguin Random House, and Simon & Schuster.

Pros:

  • Validation. Your book was deemed worthy to be published by one of the big guns in publishing. 
  • Getting your book into brick and mortar bookstores is initially easier. 
  • You’ll have a team of editors, cover designers, and formatters to work with.
  • No upfront financial costs and sometimes a royalty advance.

Cons:

  • Slow process. It could take years to get an agent. Then it could take more years before your book is launched.
  • You lose creative control over your title, cover, and marketing. 
  • Royalty is reduced by expenses incurred, so it could be as low as 7% of total sales.
  • Marketing may be inadequate to generate sales or not be part of the package deal at all.

Self-Publishing

There are all sorts of self-publishing platforms out there these days, including Amazon, Barnes & Noble, Lulu, Kobo, and Wattpad among others. When you self-publish your book, you are basically asking a publisher to print your book and sometimes distribute it. You retain all copyrights and ISBN numbers as well as any books you have printed and purchased through the publisher. 

You might do better as a self-published author if you are producing books on niche topics, highly specific themes, rather than general interest works. Remember, just because there are not so many hoops to jump through, doesn’t mean you should aim for the creation of the best book possible. That means editing, proofreading, checking for formatting errors, and so on. 

Pros:

  • You are the final say in your book’s content, design, and marketing strategy. 
  • It’s faster to get from finished manuscript to market and get paid. 
  • You’ll earn higher royalties, usually 35% to 70% of each sale.
  • You can sell your book in other countries while retaining the rights to your work.  
  • If you do well at self-publishing, agents might contact you for a traditional book contract.

Cons:

  • You have to do everything yourself, or hire someone to edit, format, design a cover, and market your book. 
  • There’s still a stigma to self-published work. Writers are often not considered “real” authors until they get a contract. 
  • You’ll need to budget for editing, cover design, and marketing expenses. 
  • It’s more difficult to get your book into brick and mortar bookstores. 

Hybrid Publishing

If you go the hybrid publishing route, you can hire a publisher and keep your copyrights. The publisher will publish your book with their company imprint as well as providing a professional cover and do the editing. Some companies will market your book, while others leave that aspect up to you. It’s important to understand what services you will be receiving for your fee. 

Hybrid Publishing companies include 3rd Coast Books, Page Two Strategies, Greenleaf Book Group, TCK Publishing, Plum Bay Publishing, Rebel Press, and Unbound to name a few.

Pros:

  • The publishing company provides professional printing, layout, cover design, and editing.
  • You retain copyrights.
  • Royalties are higher than standard. 
  • Great for niche books.

Cons:

  • Fees to the publishing company can be substantial. 
  • You are responsible for marketing.
  • It’s more difficult to get your book into brick and mortar bookstores. 
  • Sometimes it’s hard to tell the difference between a hybrid publisher and a vanity press.

There you have the three types of publishing available these days. Knowing a little about each can help you better decide which route to authorship you’d like to take.

***