In 2020, Amazon opened up the world of sponsored brands to authors. Using this feature, authors can feature up to five similar books in a cost-per-click (CPC) ad. If a viewer clicks on the ad, they will be taken to a custom landing page. Currently, this is only open to U.S. authors, but eventually, I’m sure it will be available to authors in other countries that Amazon services.
From your KDP bookshelf, choose Promote and Advertise. Then choose the Amazon.com marketplace under Run an Ad Campaign. To begin, choose Sponsored Brands from the campaign types.
You’ll need to add a credit card to launch the campaign, otherwise you can save it as a draft. Create a campaign name, something memorable such as Survival Guide Ad or Writers Books Ad. Next choose a start and end date. Set your budget. A lifetime budget is only available for ads with an end date. If you have used more than one pen name, you’ll be able to choose here which one you would like to highlight in the ad as well.
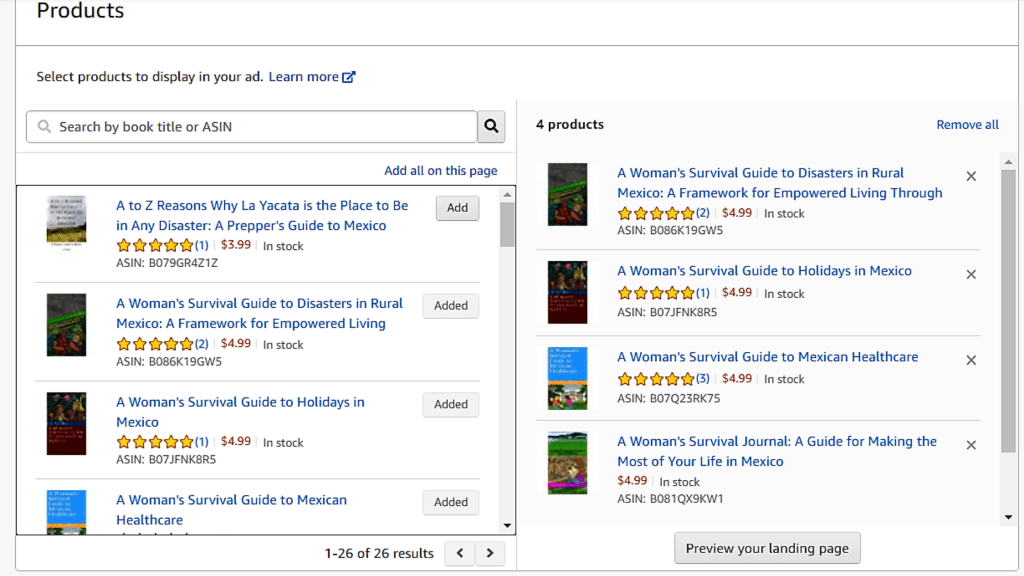
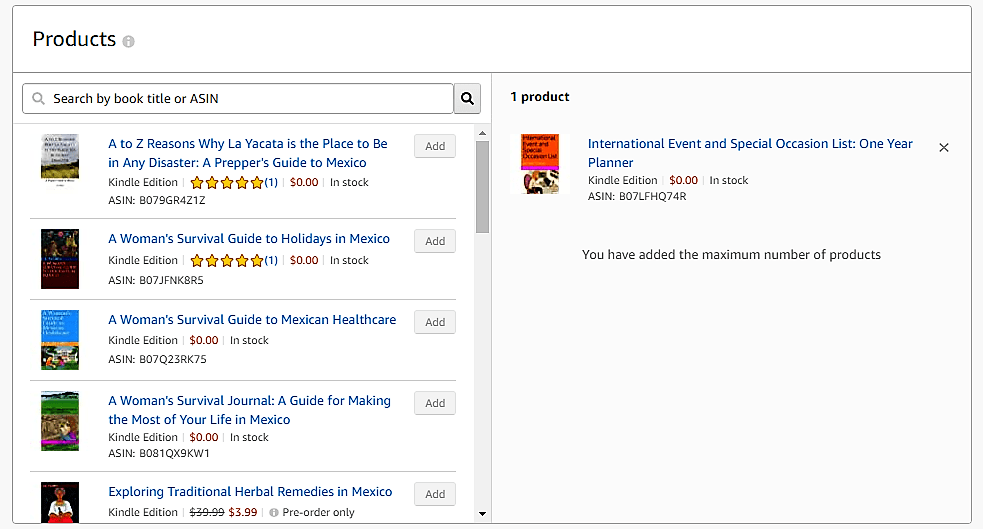
Next you’ll choose the books you’d like to highlight with this ad campaign. You can choose books in the same series or books that are written in the same genre.
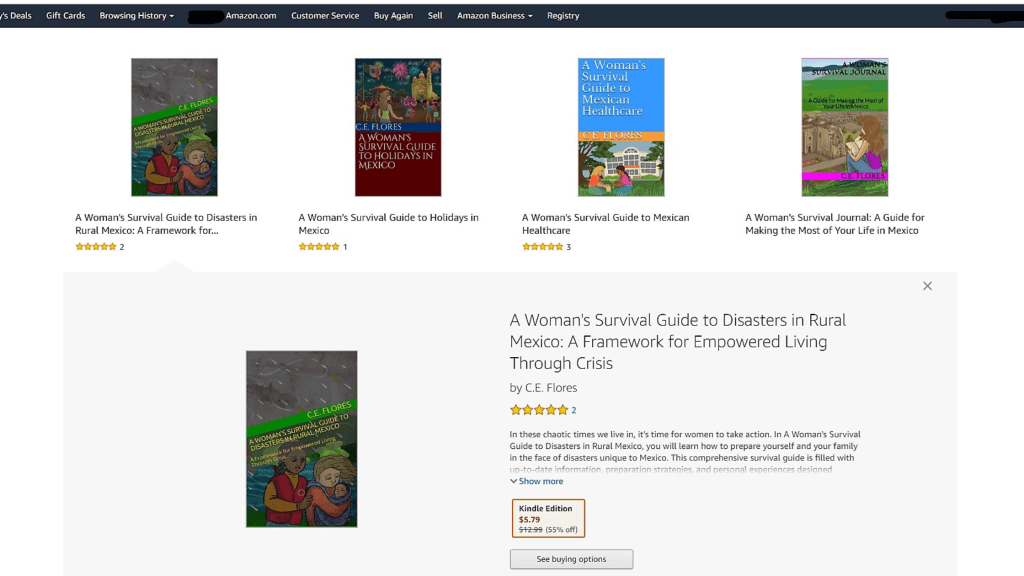
You’ll have a chance to review how the custom landing page will look. Your books will be listed across the top, and one listing will be expanded below them.
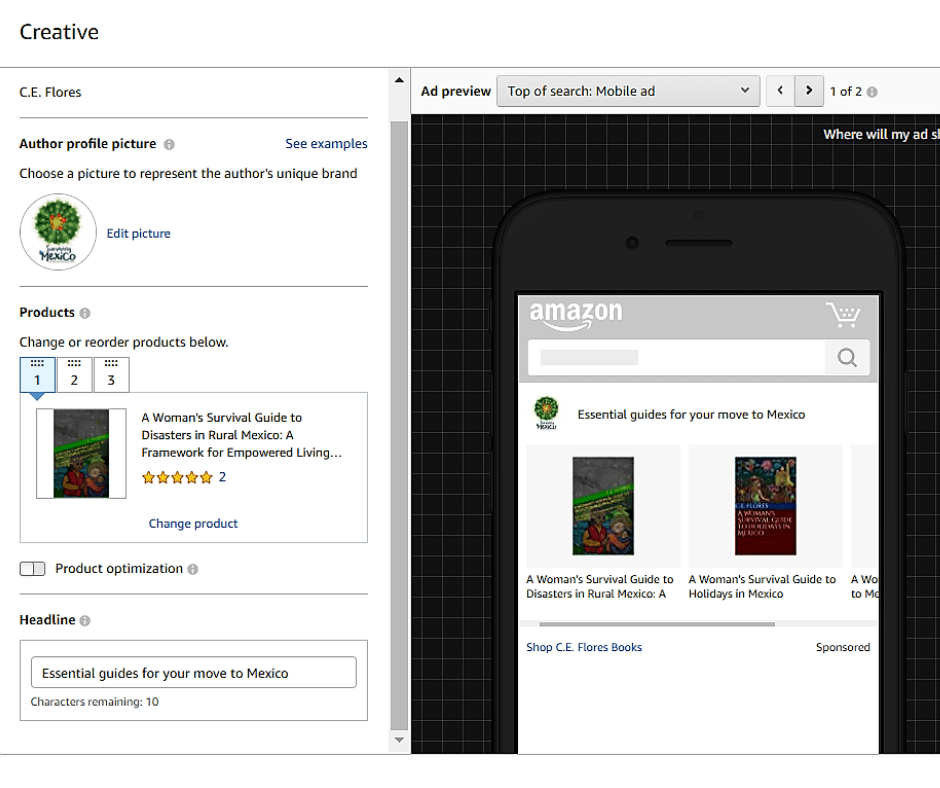
If you aren’t happy with the book order, you can change that in the next section Creative. Add an author photo or your brand logo if you have one. The image should be at least 300 x 300 pixels and smaller than 1 MB. Use PNG, JPEG or GIF. The toggle Product Optimization lets Amazon automatically replace the books you’ve selected with different ones if they are more relevant to a user’s search. Create a headline that summarizes what you are presenting like Guides to make your move to Mexico easier or Aids designed to help you format your book today. Amazon suggests using sentence case rather than all capital letters and avoiding extra punctuation like !!!!.
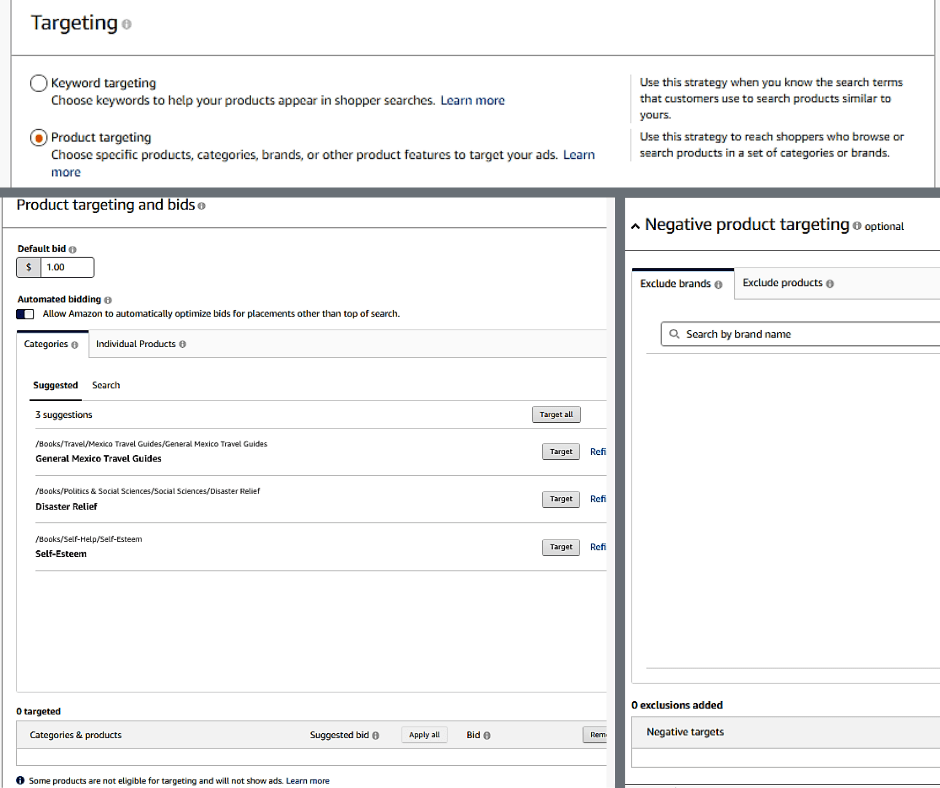
You can choose from Keyword or Product targeting, whichever you believe will best get your books in front of your target audience. You can also add negative keywords or products to exclude irrelevant terms.
Finally, if you’ve already entered the billing information, then you can submit everything for review.
Lockscreen ads appear on Kindle and Kindle Fire devices of people that have read a book related to one of your target words in the past. Lockscreen ads are only available for eBook promotions, not paperback.
They are charged on a cost-per-click. So if no one clicks on your ad, you aren’t charged for it. When readers do click on your ad, they are taken to your eBook’s detail page on Amazon. These types of ads are only available on Amazon.com.
After choosing the Lockscreen ad option, you’ll be taken to the page to set up your ad campaign. Here, you will enter a campaign name to help you keep track of different ads. It’s not information that is visible in the ad. It is for your organizational use only.
Then choose a start and end date for the ad campaign. The start day will always be two days from the date you submit the campaign to Amazon for review. Amazon recommends you run your ad campaign for at least four weeks.
To figure out what your lifetime budget is, multiply the number of days you want the ad to run by your daily budget. The minimum lifetime budget is $100, so you’ll have to plan to spend at least that much for each ad campaign. Remember, if no one clicks on your ad, you aren’t charged with this sort of campaign, so that $100 could stretch out quite a while.
If your goal is to generate clicks quickly, choose the Run campaign as quickly as possible option. If your goal is to make the most of the time you have decided to run the campaign, then select Spread campaign evenly over its duration.
Products
Under products, you’ll see all your current eBooks. Choose the eBook you want to advertise in this ad campaign.
Interest Targeting
In this section, you will choose genres or interests that you want to target with your ad. You can choose as many as you like. Under each category, you can target all or select only the most relevant.
Bidding
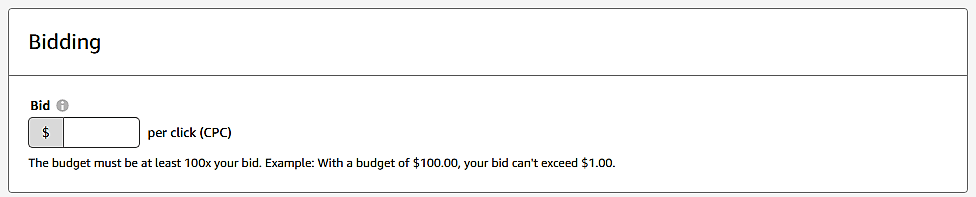
Your budget must be 100 times your bid per click. So if you have entered a lifetime budget of $100, your bid per click can not be more than $1.00.
Creative
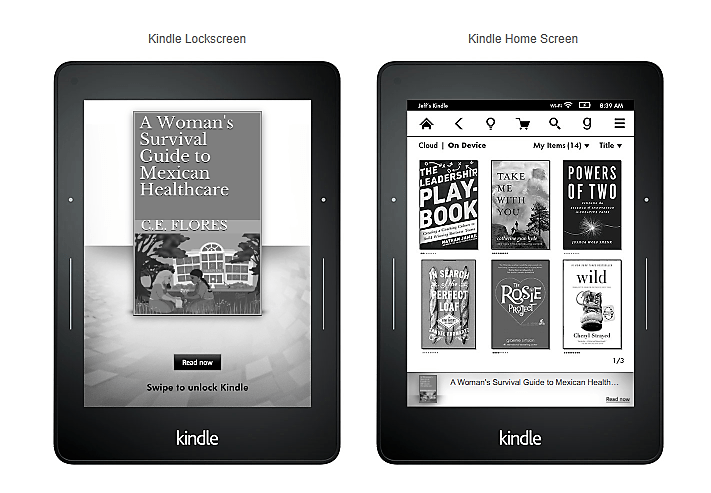
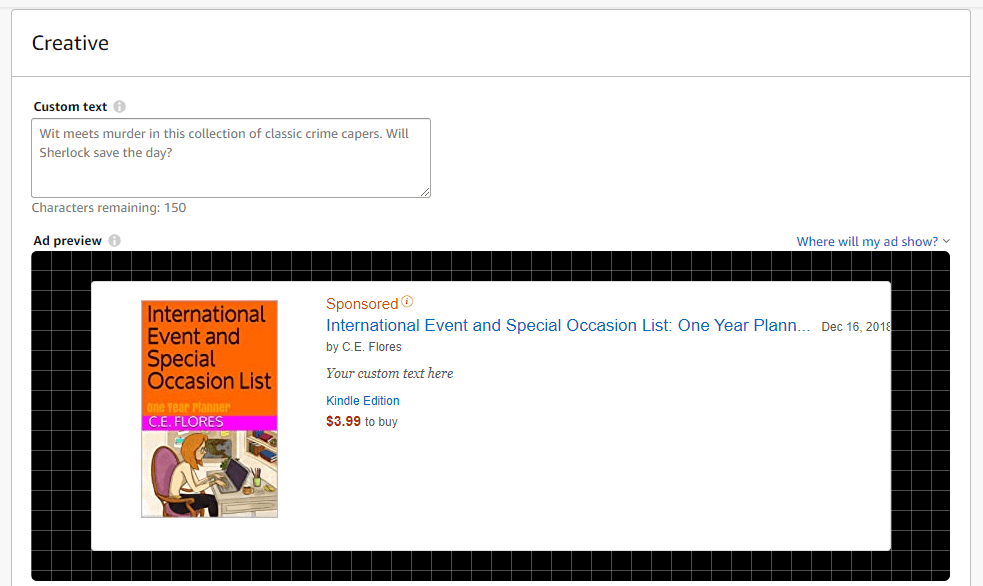
You can enter a custom text to entice potential readers. It should be at least 50 characters and no more than 150 characters. Below this you can see a preview of what your ad will look like on the Kindle lockscreen and the Kindle home screen.
Submit for Review
You will not be able to edit any part of your ad campaign once you have submitted it for review, so check everything carefully before you do so. Amazon will email you once it has been approved or if you need to make changes. This process can take up to three business days.
If your eBook ad is rejected, review Amazon’s book ad policies. Your cover might be too racy for all audiences or your book subject might not be considered appropriate for some groups of people.
Once you set up your ad account, you’ll see that there are two options to choose from: Sponsored products and Lockscreen Ads. In this post, we’ll discuss sponsored products campaigns.
Select the corresponding ad type. You’ll be taken to a page to enter the details. Create a campaign name to help you keep track of different ads. It’s not information that is visible in the ad. It is for your organizational use only.
Then choose a start and end date for the ad campaign. If you don’t designate an end day, it will continue indefinitely. If you want to extend the ad campaign past the end date, you can change the end date anytime before the date you had originally chosen.
Decide on a daily budget. This is the amount you are willing to spend on ads during a 24-hour period.
Next, you’ll need to determine whether you want to go with automatic or manual keyword marketing. If you have no experience at this, you’d do best to let Amazon choose the keywords for your book. Once you have done a few ad campaigns, you can refine the keyword targeting to best reach your potential readers.
Campaign Bidding Strategy
Now you’ll need to decide how to create a range of bid prices. Remember, Amazon will always choose the highest bid within the category to display since it will make them the most money, so this step is important.
Dynamic bids change depending on the likelihood of a sale. So if someone has searched for books about holidays in Mexico and your book is about traveling in Mexico, it’s not a perfect keyword match. Amazon will determine how likely the person searching is to be interested in your book based on complicated algorithms.
If you choose Dynamic bids–down only and Amazon determines that the searcher isn’t likely to be interested in your book about traveling in Mexico, then they will charge you less if the person does click on the ad.
If you go with Dynamic bids–up and down, then Amazon will charge you more when it’s a perfect keyword match than if it’s only a partial match. Therefore, if the person is searching for books about traveling in Mexico, then Amazon will charge you the full price. If the person is looking for a book about holidays in Mexico, then they won’t, since it’s not a sure thing.
Fixed bids take the fluctuation out of the equation. You’ll be charged the same price no matter the likelihood of purchase according to the algorithms.
Adjust bid by placement will give you more opportunities to have your book prominently displayed either at the top of the page or on product pages. Remember, it’s a bidding process, so the higher your bid, the more likely Amazon will choose your ad to display over someone else’s ad. Of course, that means you’ll pay more for that privilege.
Ad Format
You can either use a standard ad format or a customized one. Custom text is only available on Amazon.com right now. However, if you are using that marketplace to run your ad campaign, you should use the opportunity to hook readers with creative commentary.
If you select the standard ad format you can create an ad group. This allows you to advertise similar books under the same bid parameters and keywords you’ve already chosen.
Products
If you have reached the ad campaign setup page by choosing Promote and Advertise from your KDP If you have reached the ad campaign setup page by choosing the Promote and Advertise option from your KDP bookshelf, then your product is already selected. If not, choose one from your product list.
Automatic Targeting
You can choose the default bid or set the bids by targeting groups. Amazon helpfully supplies a suggested bid for your book as well.
When you set bids by targeting groups, you can change your bid amount depending on if the keyword search is a close or loose match, a word substitute or a complimentary term.
So if your keyword is “holiday celebrations in Mexico” a close match would be “holidays” or “Mexico” whereas a loose match might be “Latin America” or “customs.” A word substitute would be “customs in Mexico” where the word “holiday” is used instead of the term “customs.” “Customs in Latin American” might be a complement keyword phrase. It isn’t exactly what the person was looking for, but your book falls into the general category.
Negative Keyword Targeting
Negative keywords allow you to define who sees your ad based on their search parameters. You can use it to make sure your ad isn’t shown for a particular term because it is irrelevant.
For example, if your book is about Mexico, a negative keyword you could set up is “New Mexico” because people looking for New Mexico are not your target readers, typically. Doing this saves you money since your ad won’t be displayed for New Mexico searches.
If this is your first ad, you might not know what terms to include as negative keywords. You can get a general idea from negative keyword generators online like WordStream. It isn’t absolutely required that you list negative keywords, so don’t sweat it too much.
Creative
Under Creative you’ll see a preview of your ad. You can insert custom text to hook the potential reader if you like.
Submit for Review
If you have already entered your credit card information for billing, you can submit your ad campaign for review. Amazon will then determine if your book meets the requirements and standards set out in the policy guide. If it is, you’ll be billed monthly for the total number of showings during that time period.
Amazon offers a way to reach more potential readers through Amazon Advertising. These ads are run on a cost-per-click auction based model. That means Amazon holds a real-time auction every time someone does a search to determine which ads will appear based on relevancy. The cost-per-click, your “bid” is the amount you choose to pay if someone actually clicks on your ad.
Amazon will always choose the highest bid within the category to display since it will make them the most money. So suppose you have a book about canaries that you want more people to be aware of. Amazon suggests that you bid $0.70 but the bid range for that category is ($0.40 – $1.40). You decide to go with the custom bid of $0.70. However, someone else has a book about canaries and their bid is $1.40. Amazon will choose to show that bid more often than yours when the criteria is met in a search.
Your book cover and book content have to meet certain requirements to even be considered. To see the complete list of prohibitive cover images and book themes, you’ll need to read through Amazon’s book ad policies.
Currently, you can run Sponsored ads on Amazon in the US, UK, Germany, France, Italy, and Spain. Lockscreen ads are only available for the US.
You can advertise books written in languages other than English, but all language in the ad must match the language of the Amazon site where the ad is running. For example, if you want to advertise a book written in Japanese on Amazon.com, the ad must be in English. Also, book titles must clearly state if the book isn’t in the language of the Amazon site where the ad is running.
If potential readers click on your ad, they’ll be taken to the detail page of your book on Amazon. Therefore, before you set up an ad campaign, you should make sure that the layout is eye catching and the book blurb is interesting. Check the visual appeal of your book cover, too.
Creating an Ad Account
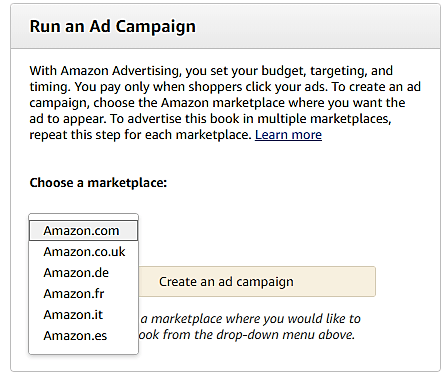
To begin, go to your KDP bookshelf and select a book you want to run a campaign for. Choose Promote and Advertise under the ellipses.
Then you’ll want to look at the Run an Ad Campaign section. Choose a marketplace from the available options.
You’ll be taken to a screen that forces you to accept Amazon’s policies before continuing.
Once you do so, you’ll see that there are two options to choose from: Sponsored products and Lockscreen Ads.
Sponsored products are those that you see across the top after you search for a particular book topic. Lockscreen ads appear on Kindle and Kindle Fire devices of people that have read a book related to one of your target words in the past. Lockscreen ads are only available for eBook promotions, not paperback. We will discuss these individually in future posts.
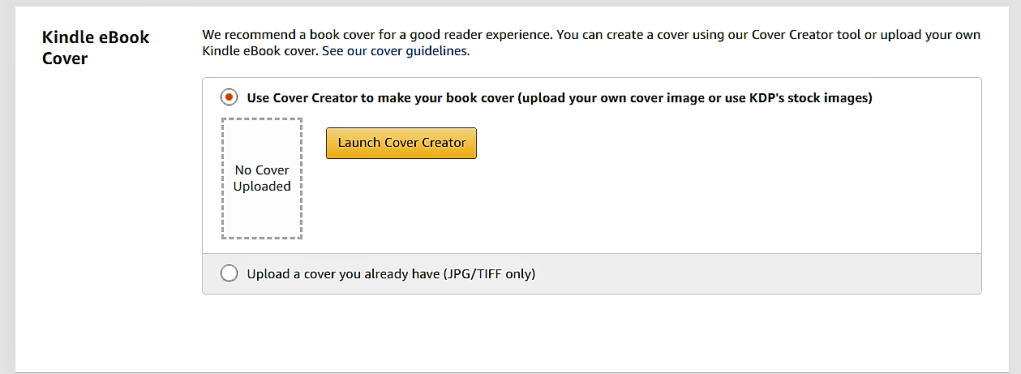
It’s perfectly acceptable for you to design, or have someone design, your cover. However, Amazon provides this nifty little tool called Cover Creator to help you get the dimensions just right. The layouts and font choices are limited, but if you’re a newbie like me, Cover Creator will add a bit of professionalism to your ebook.
Launch the Cover Creator when prompted after you have uploaded your manuscript on the Content Page. The components are slightly different for print and ebooks, so in this section, I’ll just be talking about the steps for creating a cover for an ebook.
Next you’ll be prompted to choose an image from the gallery, upload a JPG, PNG or GIF image from your computer, or skip this step if you don’t have an image you want to use. Make sure the image you choose is public domain or you have permission to use it so as not to violate copyright laws.
After you’ve uploaded or choosen and image, Cover Creator generates a variety of potential cover designs. Since the program uses the book details including author, title, subtitle and ISBN, (in the case of print books), the image that you upload should not have any of these items on it. Notice in the image above that my image already had text on it so I needed to upload another image.
If you accidently chose the wrong image or if you get a poor resolution notification, you’ll have a chance to change the image in a moment. Your image should be 300 pixels per inch (300 DPI) at the size you want it to appear on your cover.
Choose the color scheme you would like to use. You can choose from already paired colors or pick your own.
Select a layout for the print part of the cover.
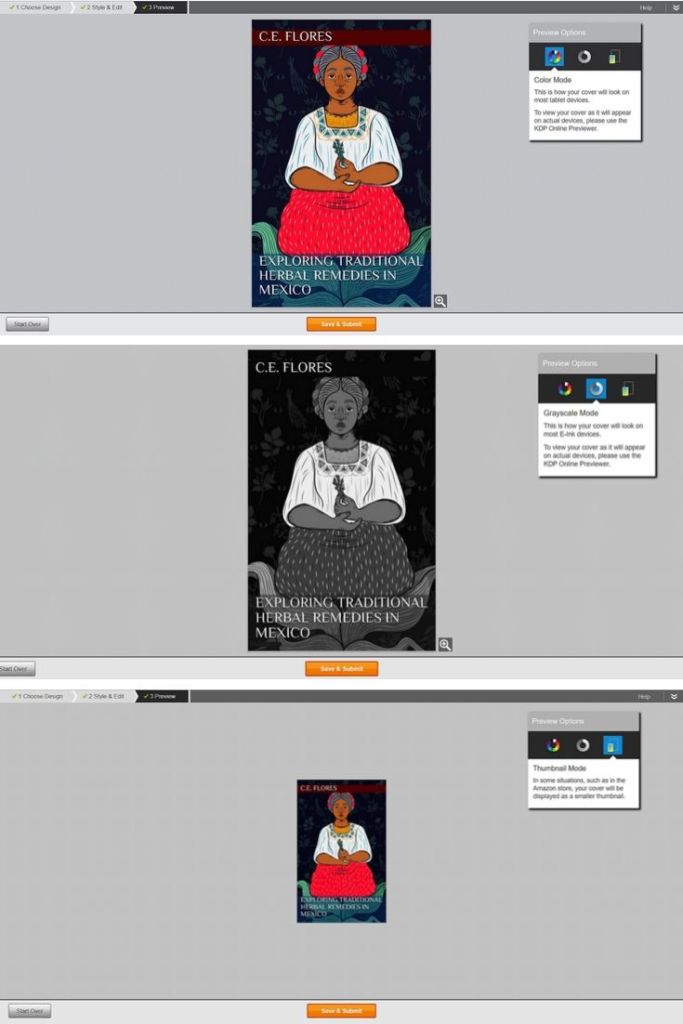
Finally choose a font and select the orange “Preview” button.
Make sure to preview your cover in color, greyscale and thumbnail modes. Make sure the text is readable and the image looks good.
If you like how everything looks, you can hit “Save & Submit.” If you don’t, then you can “Start Over.” If you want to change your image, click on it and you’ll get the option to choose another image or change its size, position or rotation.
Voila! Now you’ll see a checkmark with “Cover uploaded successfully” next to the thumbnail of your finished cover.
Assignment: Use Cover Creator or upload your ebook cover.
In order to start some hype about your ebook, you can set it up as a pre-order book after you have published your print version. Pre-orders count towards sales ranking even before your book is released.
Pre-orders are not available at Amazon.in yet, but you can set your book up for pre-order at any other Amazon Kindle Store. Customers can order it anytime up to the release day. Once it’s released, they will receive their copy.
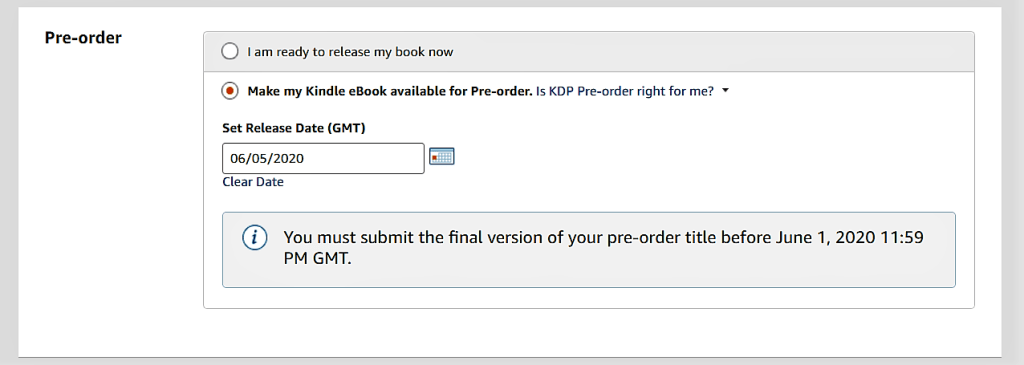
To create a pre-order, set it up as you would any other KDP ebook. When you get to the pre-order section, choose “Make my Kindle eBook available for Pre-order.” and choose a release date. You’ll get a message telling you that you need to upload the final draft a few days before that release date. Save and continue.
Under the Manuscript heading, you are given the option to upload your manuscript now or wait until a few days before the release date to upload it.
Continue through the setup process. On the final page, you’ll see the yellow button “Submit for Pre-Order” instead of the normal publish option.
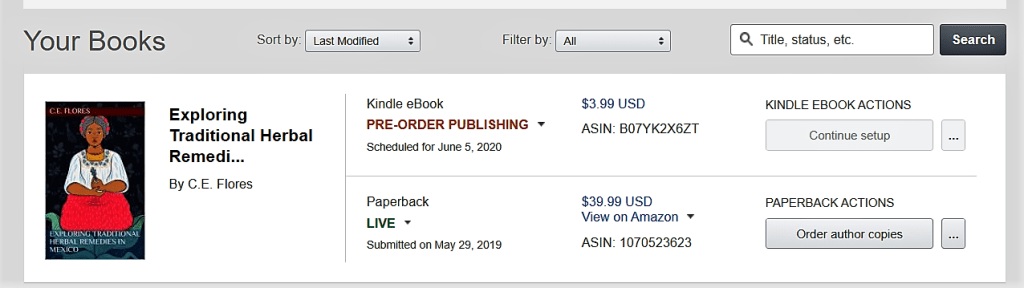
Once you submit your manuscript, the detail on your bookshelf for that book will say “Pre-Order in Review.” While Amazon is setting up the detail page for your pre-order book, the notification will say “Pre-Order Publishing.”
Once it is live, you’ll receive an email where you can check out the detail page on Amazon for this title.
If you haven’t submitted a manuscript, there will be a timer on the setup page that lets you know how long you have to submit your file so that it will be delivered to customers on time. If you don’t upload a manuscript before that date, the pre-order will be canceled and you can’t set up any other pre-orders for the period of one year. You won’t be able to make any changes to the manuscript after the submission deadline until after the release date.
You can keep track of pre-orders on your reports page. The report will include pre-ordered ebooks, cancellations and net pre-order units. The sales information will not appear in the royalty reports until after the book is delivered to customers.
You can change the release date if you need to. If you move it up, you must submit the republish your manuscript. Customers who have already pre-ordered your book will get the book earlier.
You can delay the book’s release once up to 30 days before the submission deadline. If you delay the book a second time, you won’t be able to create another pre-order for a year. If your book is delayed, customers who have already ordered your book will receive an email to that effect.
You can also cancel a pre-order by unpublishing it from the bookshelf on KDP. If you cancel though, you won’t be able to set up another pre-order for one year.