When I go on vacation, I use social media schedulers to keep things rolling while I do other things. Social media can take over your life if you let it. Promoting your book, sharing interesting articles by prominent writers, highlighting book reviews and so on can take time away from your next book project.
In this post, I’d like to talk about the different social media schedulers that I use. Each has free and paid options. I suggest trying the free version first to see if it will work for you before signing up for the paid version. This list isn’t all-inclusive. You may find other schedulers that work better and that’s just fine. This post is meant as an introduction to the concept of social media schedulers.
Social media sites have limits on how often you can post per day. I’m not nearly close to the upper limits even using schedulers. I average 2-3 posts per day at most.
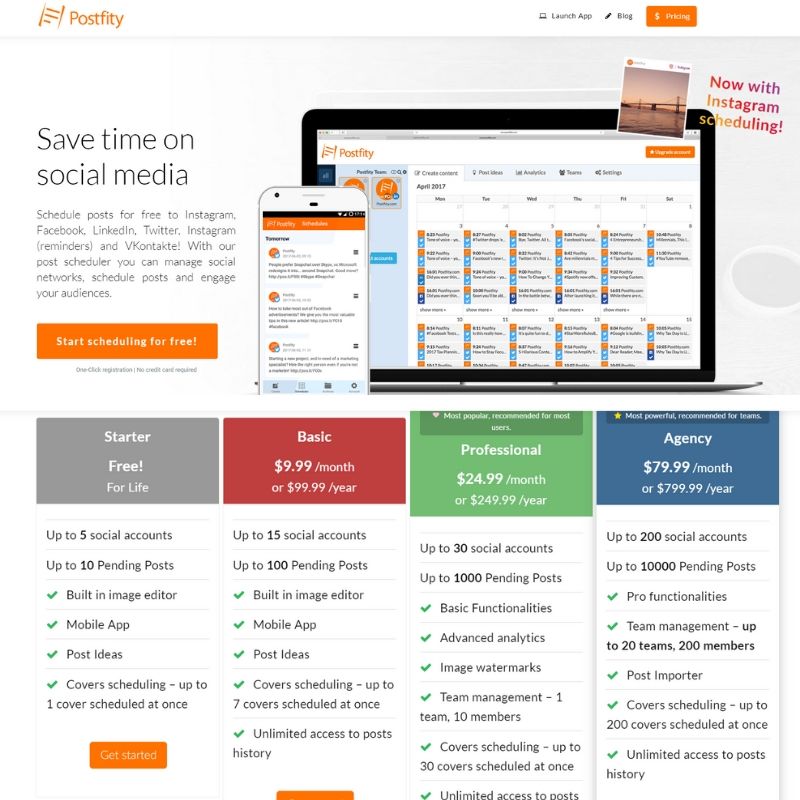
The first scheduler I use is Postfity. I can schedule up to 10 posts in advance with the free version. That works for now. For a while, I did use the paid version because it is substantially less expensive than the other schedulers but I went back to the free version. Postfity is also less complicated to use than Hootsuite which is a great thing for beginners, like me.
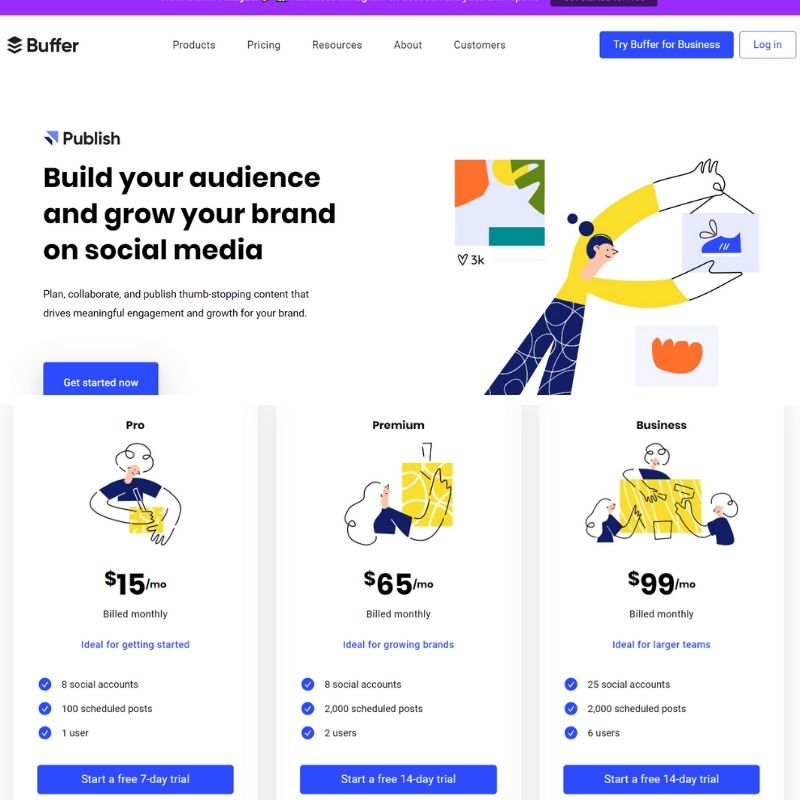
The second scheduler I use is Buffer. Buffer is pretty similar to Postfity. The free version also lets me schedule 10 posts ahead of time. So with these two schedulers, I have 20 days, one post a day all set.
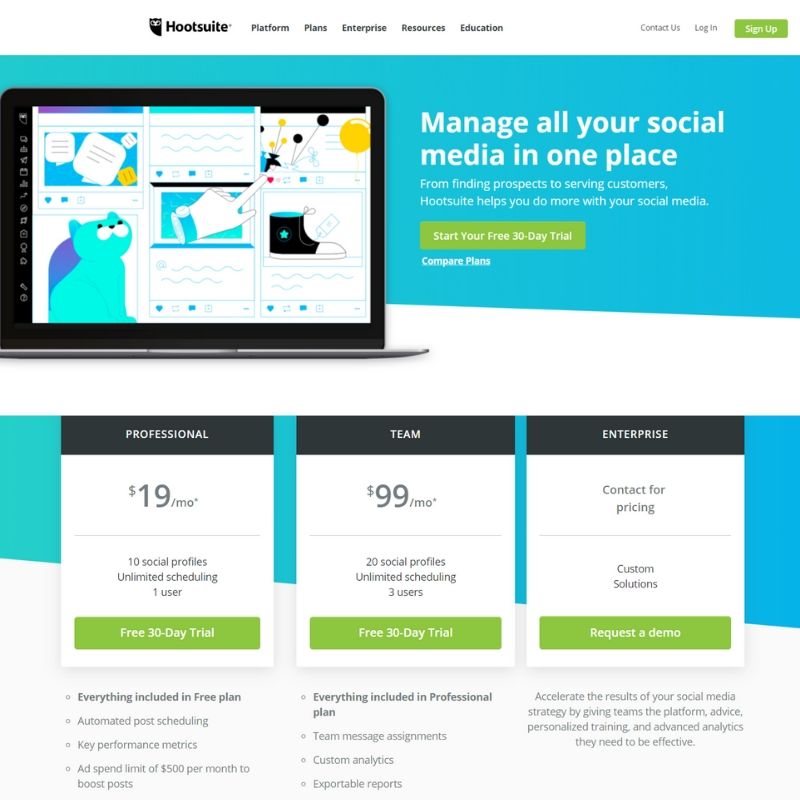
Hootsuite is the most expensive and most comprehensive scheduler I use. With the free version, I can schedule 30 posts in advance, which is perfect for one post a day for the entire month.
So using these three schedulers, I can provide interesting content for my followers without having to spend time on social media daily.
Assignment: Check out different social media schedulers and see which works for you.
I’ve mentioned a few places, like the back cover, author page and website, where you can highlight what others have said about your book. Amazon ranks your book based on the number of downloads and the number of reviews you have. The more reviews you have, the more Amazon promotes your book, which in turn means more sales and more reviews.
So let’s talk about how you can get some reviews to highlight, shall we?
First, let’s discuss what NOT to do. If Amazon finds out you’ve done one of these things, it will remove your book and ban your account.
Don’t:
Pay someone to leave a review.
Offer a free gift (including a free copy of your book or gift cards) for reviews.
Participate in review swapping where someone reviews your book and you review one of theirs.
Have your mom write a review.
If you are in doubt whether Amazon will allow it or not, check out the Author FAQ page.
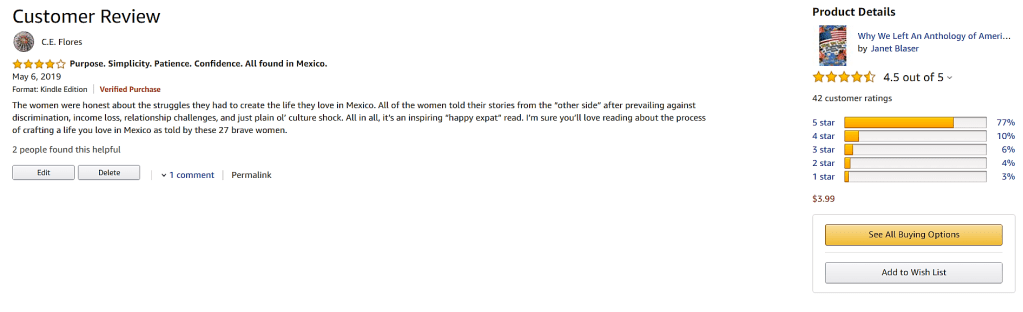
An example of a Verified Purchase book review.
Amazon is looking for authentic reviews which can be used to gauge the quality of a product honestly. Verified purchase reviews hold more weight than those that are not in the Amazon algorithm. A verified purchase means the person bought your book on Amazon on a day that it wasn’t listed at a promotional price. Unverified reviews are also valuable but don’t carry as much weight in that mysterious algorithm.
Do:
Ask people in your target niche to read and review your book as Beta Readers.
Include a request for a review on Amazon at the end of your book.
Ask for reviews on your book’s landing page on your website.
Contact Book Bloggers.
Be patient.
Beta Readers
Beta Readers are people who you believe would not only enjoy your book, but provide constructive criticism so that you can make your book better BEFORE the official book launch. So although you can ask your mom to look things over, if she wasn’t an English major, her input might not be as helpful as say, well, an English major.
Once someone has agreed to be a Beta Reader, you want to keep in regular contact with them. Your initial email will be a genuine thank you as well as specifics on what you are looking for from them, error correction, help with foreign language expressions, continuity issues and so on. Include a digital copy of your book, unless they specifically request a print copy In that case, you can send them a proof copy. Also be specific as to when your book is launching and when you’d like final commentaries so that any changes can be done before the book launch.
Beta readers are a great source of authentic reviews. You made a personal connection with the Beta reader through the editing process and know for sure that he or she has read your book completely. You might even have an idea of what he or she thought of your book.
After a Beta Reader has finished reading your book, go ahead request he or she post a review on Amazon specifying it can be either positive or negative. A Beta reader probably received an advanced review copy (ARC) so make sure to ask your Beta readers to include a statement to the effect “I received an Advanced Review Copy of this book” in their review. Disclosure is extremely important here.
Ask for Reviews
You can ask for reviews at the end of your book and on your book’s landing page on your author website.
Readers who have made it to the end of your book probably enjoyed it and might be so inclined to give you a shout out via an Amazon review if you make it easy for them. Include a direct link, but not an Amazon affiliate link, to your book’s detail page on Amazon in your ebook. In a print book, usually just the request is enough. If someone spent money for a print version of your book, odds are good they have something to say about it, whether it is positive or negative. So they may well be interested in leaving a review on Amazon if you ask.
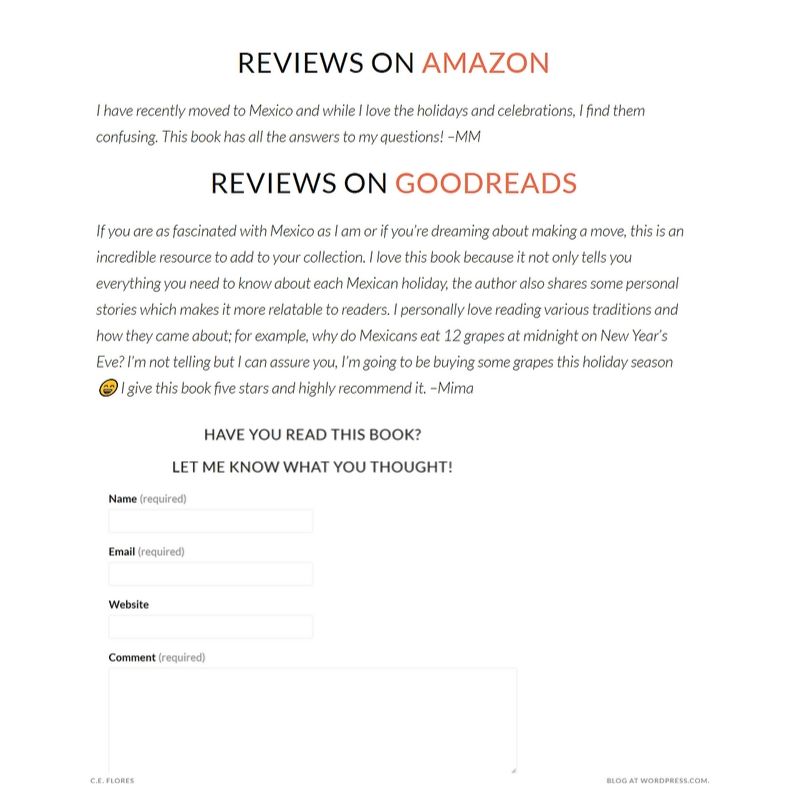
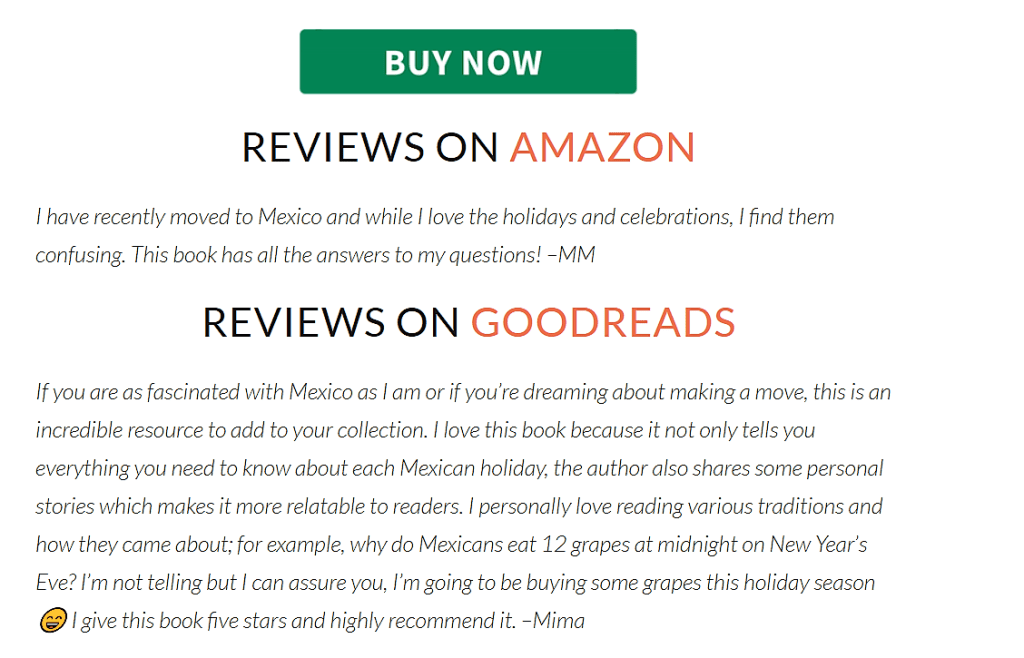
The section devoted to reviews on my author blog on one of my book’s landing pages.
You book’s landing page on your author’s website or blog is yet another place to ask for reviews. The landing page should have the book blurb and the front cover image. On my book’s landing page, I have included a review from Amazon and one from Goodreads under the book blurb with links to Amazon and Goodreads. I also have a contact form right there, so if someone wants to say something about my book, they can.
Book Bloggers
Book bloggers are an untapped gold mine for self-published authors. The blogger’s unbiased opinion is posted on his or her blog and you can select quotable points to include on your author blog, in your book as a testimonial, and on Amazon–not as a traditional review but in your book blurb (description).
This was an email sent to me as a request to review this book. The book fit my blog’s reader demographics so I was happy to review it. Notice that the publist included the full press release, including cover images, for me to use on my blog.
Before contacting a book blogger, read their book review policy. Make sure that your book fits into the genre the blogger enjoys reading. In your initial contact, reference a book review from their site that you enjoyed reading. Include your book’s blurb and any deadlines you might have (launch date).
If the book blogger accepts, be sure to thank them and send the electronic version of your book (unless they specifically requested a print version) as an attachment. The blogger will usually let you know when their review of your book is live. Be sure to send a follow-up thank you and promote the blogger’s review on your social media accounts.
Be Patient
Potential readers like to know that someone found your book to be worth and time and effort to read and you’ll be happy to oblige them, as soon as you have some reviews that is.
You might not have many book reviews initially. You’ll need to be patient. Book reviews will come and when they do, showcase them here, there and everywhere! Use snippets from book reviews as testimonials on your back cover. Use quotes from Beta readers as promotional copy.
And remember, the more authentic reviews your book has, the more probability that the right readers will find your book.
Negative Reviews
Your book won’t be everyone’s cup of tea, and that’s just fine. Try not to let it get to you emotionally. It’s not the end of the world. Really.
I know you’ve put your heart and soul into this book, but let’s be practical here. Does the reviewer have a valid point? Did you leave out a key point? Do you need another round of proofreading? Are there formatting issues?
If there is something you can do to improve the quality of your book, do it. Then upload the new version of your book. Anyone who has purchased a digital copy of your book through Amazon will get the revision. Neat huh?
There are a few things you can do to prevent some types of negative book reviews.
You can reduce negative book reviews by offering the “Look inside” option so readers can preview before buying. Readers will know what they are getting into ahead of time.
You should also make sure your book description is accurate. I know if I have purchased a book and find out it’s only 20 pages long, I get irked. So, if your book is short, include that information in the book blurb.
Make certain your book delivers real value to the reader. If your book is entitled: How to Become a Millionaire in 30 Days, then you’d better have something in it besides links to your course on becoming a millionaire.
Proofread! Proofread! Proofread! If you have a plethora of spelling and grammatical errors, it’s a turn off for any reader. After a certain number of errors in a book, I typically stop reading. If the author didn’t invest any time in creating a quality product, I’m not wasting my time by reading it.
Then there are readers who are just negative and extremely vocal about it and there’s nothing you can do about that. You aren’t a real writer until you’ve negatively affected someone, so think of a negative review as a badge of honor, if you will. Chin up, buttercup. Your perfect readers are out there!
Assignment #1: Add a request for review to your book’s landing page.
Assignment #2: Add a request for review to the end of your book.
Assignment #3: Find Beta readers and ask for their feedback.
Assignment #4: Contact book bloggers in your niche.
If you think your book would be something a class or book club would enjoy discussing, consider adding a section with open-ended questions in the back matter. This part might be called Discussion Questions or Book Club Guide or any number of imaginative monikers.
The questions might talk about the theme, historical significance, character development or symbology. Don’t be hesitant to pose questions about controversial themes. The idea is to provoke further thought and meaningful conversation.
Make sure the questions you include can be answered either through something the reader can find in the text or with a bit of research. Other questions can be expressed opinions.
Try to include a good mix of the following:
Why…..?
How would you explain….?
What is the importance of ….?
What is the meaning of …?
Compare….
Contrast …
What is the difference between…?
What is the similarity between…?
What are the causes of …?
What are the results of …?
What connection is there between…?
You can divide the questions by chapter however try to keep them in the same order as the topics appear in the text. You can choose to number the questions if you like.
Designing discussion questions is a great way to put yourself into your reader’s shoes. Is there something that should be explained more or is unclear in your book? Now’s the time to go back and edit it.
Assignment: Even if you don’t plan on including this section, take the time to create at least 20 questions that would be useful in leading a thought-provoking discussion about your book. Are there things you need to change?
If you are like me, a bit of an introvert, social media interaction is downright painful. Lack of Likes and trolls can mess with your self-esteem. What if there were a non-communication social platform you could use? Would you do it?
Well, there is! Pinterest! You don’t have to like everything you see, engage in potentially controversial group conversations, or worry sharing too many posts. You get in, pin some things and get out, just like that!
As a writer, you can create boards for writers or readers. Pin your favorite books, authors, book quotes, motivational phrases, and writer woes. If you write an article on your author website about the top 10 best ways to promote your self-published book on Amazon, include a pinnable image in the article and pin it.
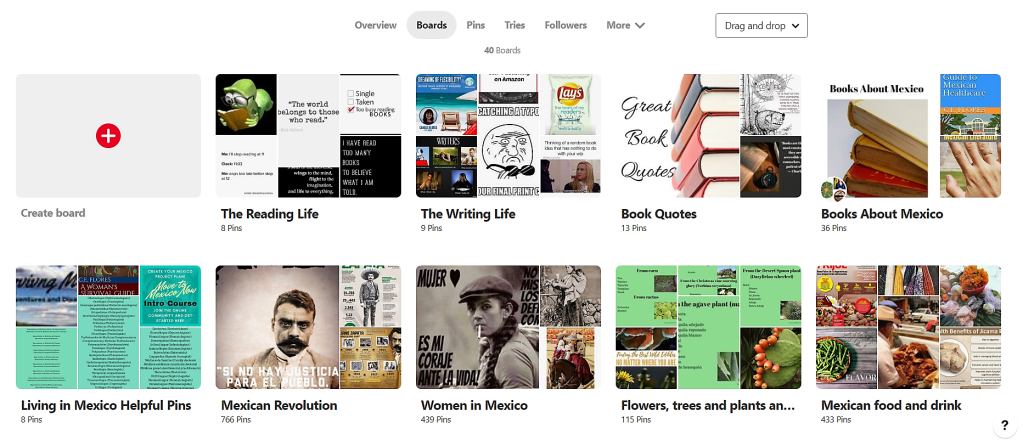
You can also create boards for each of your books. This isn’t a promo board, but rather of pictures of your research. Take a look at how the author of Deadly Kin did this. Her profile picture lets us know she writes Regency romance type books. She’s listed the research books she used and then look at the images she included. You can bet your bottom dollar that a couch like The Knole Sofa pictured is a key point in the book. Intriguing, right?
Even if you already have a personal Pinterest account, you’ll want to use a business account for the analytics aspect. You can transfer your personal account to a business account (and make boards you don’t want the world to see hidden) without too much difficulty.
To do this, log in and click the three dots (…) that are in the upper right hand corner. Choose : Add a free business profile. Decide on topics that describe your business, as well as adding the business type, name, email, and website. If you have an author Instagram, Etsy or Youtube account, you can link them up to Pinterest. You’ll be given the option to copy boards from your personal profile. If you want to start fresh, you’ll be taken to the area where you can create your first Pin.
I absolutely LOVE Canva for creating Pinnable images.
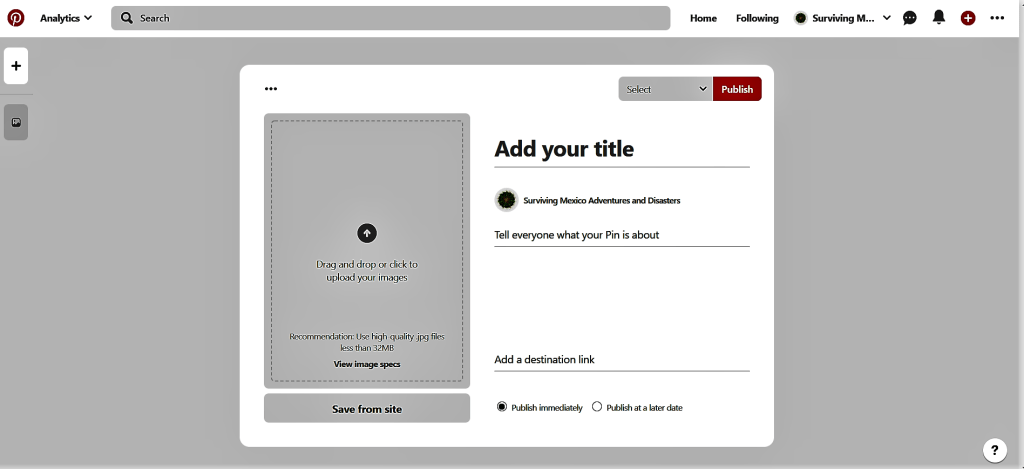
Once you have an image, to create a pin, click on the plus sign in the upper right hand corner.
Upload your image. Write a headline and short description. Add the link you want people to go to if they click on the pin. Choose a board to pin your pin to. Publish now or schedule it for later and that’s it.
Spend some time scrolling through your Pinterest feed. Go ahead and add pins to your boards gleefully. If you come across something worth pinning in your web browsing, do it! It only takes a few seconds. Pinning from the site itself keeps the image connected to the right content so other people can enjoy that little tidbit too.
A pen name, also known as a literary double, is a name used by an author which may be a variant of his or her actual name or may in no way resemble it.
This pseudonym is used sometimes to disguise the writer’s gender or to distance the author from other works. So, for instance, Mary Berton wrote several explicit romances. If Mary wanted to write finance textbooks, she might list her name as M. Berton on those. Both are her name, but the use of an initial instead of Mary not only disguises the gender of the writer but distances the two genre writings.
Here are some authors who have used pen names:
Mark Twain’s real name was Samuel Langhorne Clemens.
Theodor Seuss Geisel was Dr. Seuss.
George Orwell was actually Eric Arthur Blair.
Stan Lee was really Stanley Martin Lieber.
Steven King also wrote under the name Richard Bachman.
Joanne Rowling has used the pen names, J.K. Rowling and Robert Galbraith.
Agatha Mary Clarissa Christie wrote mysteries with the name Agatha Christie and romance novels as Mary Westmacott.
George Sand was born Amantine Lucile Aurore Dupin.
Mary Ann Evans published her works as George Eliot.
Should you use a nom de plume instead of your given name? Well, it depends.
You might choose a pen name if you would like some personal privacy. I’ve opted to write under the name C.E. Flores, which is my actual name but with initials instead of using my first and middle names. I never used my first name on my blog, only my last, for the same reason.
If there are several other authors with your name, you might consider using a pen name or a variant of your own to avoid confusion. For example, you could use your middle name rather than your first name, or add your middle initial to your name. So Robert Carl Brown could write as Carl Brown or Robert C. Brown to distinguish him from other authors also named Robert Brown.
When considering a pen name, do not use the same name as someone famous. Writing as Stephen King might initially increase your sales, but it could cause a whole lot of trouble down the line. Therefore, look for something unique.
You may be tempted to be creative with your Author Biography when writing. After all, it’s not really you. However, don’t give yourself credentials or experiences that are not true. Things like that have a way of being found out and it will damage your credibility as an author long after you’ve forgotten about it. Stick to as close to the truth as possible.
Any digital book that has been purchased on Amazon.com can be lent to another person for 14 days. All Kindle Direct Publishing titles are enrolled by default.
If you have chosen the 35% royalty option for your book, you’ll have the option to opt out of this service. If your book is enrolled in the 70% royalty payout, then you can not opt out.
Loans are not considered purchases, so you do not receive any royalties for titles someone has lent another person.
Kindle Owners’ Lending Library
Readers who have an Amazon Prime membership can also borrow books through the Kindle Owners’ Lending Library (KOLL). Books that are enrolled in KOLL have an Amazon Prime badge on the detail page.
Qualifying readers can choose one title per month to read for free. That book is available to the borrower for as long as they like while they are enrolled in Amazon Prime.
KDP Select titles are automatically included in KOLL. You receive royalties based on the number of pages a customer reads for the first time. If the borrower rereads your book, you will not receive any royalties for the second reading.
You can see your royalties for KOLL pages read under the reports section of your KDP page along with the Kindle Unlimited information.
Assignment: Check to make sure your book is enrolled in the Lending Library. Also, find where you can keep track of your KOLL royalties from your KDP page.
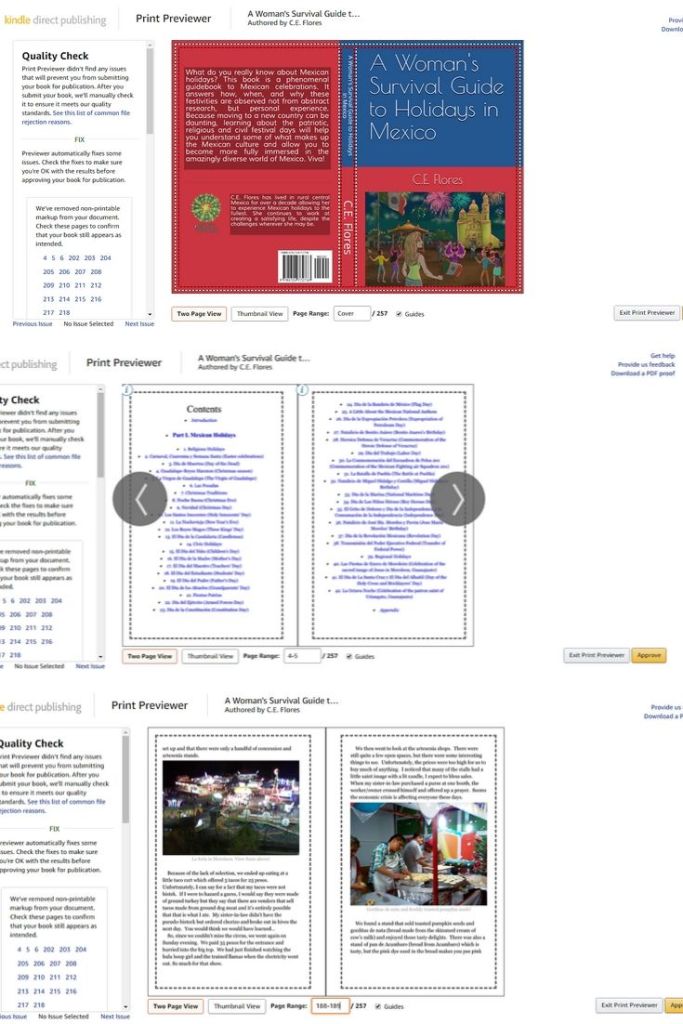
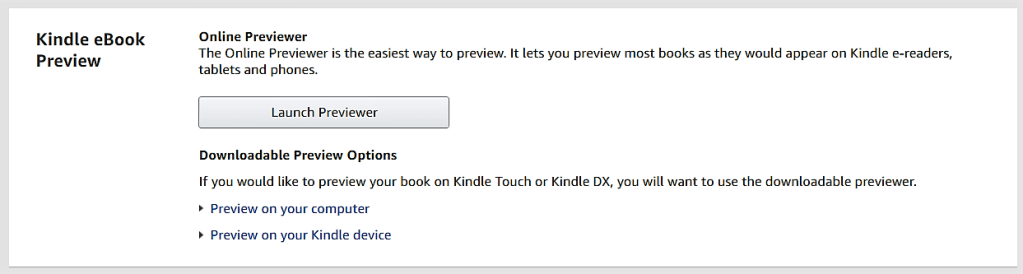
Before you publish your print book on Amazon, you must check it via Kindle Previewer. This section is under the Paperback (or eBook) Content tab after the Book Cover section.
Kindle will let you know if you have formatting errors and you’ll need to fix them before it can be published. Common problems are bleed issues (text or image goes beyond the margin) or low resolution images. If you have a hyperlink, it won’t appear in the print book.
Check every single page including the cover before approving. You can also download a PDF version if that works better for you. If there is something that you need to fix, do so, then upload the corrected manuscript and check it again. You need to approve the print preview before moving on to the next step.
The Kindle Previewer for ebooks can be downloaded if you have Microsoft Windows 7 or OSX v10.9 or later and a 1.2 GHz processor, minimum 4 GB RAM, and a screen resolution of 1024 X 768. Otherwise, you can use the online version.
Ebook checking is optional, but definitely something you should do. Since ebooks have a more fluid layout, you may not see exactly what a reader sees in the Previewer but it will give you a good idea.
You can preview by device type, orientation and font size just like you did with Cover Creator. You can look at specific elements like the tables, images, etc with the downloaded version. You can, and should, take the time to look over your book from end to end.
Remember the adage, you never get a second chance to make a first impression? Well, having your book formatted correctly is what will make the first impression to your reader. So take advantage of this option to look things over just one more time before publication.
Assignment: Use Kindle Previewer to check your ebook and print book. Make any changes, unload the corrected manuscript, and check it again.
Amazon has a fabulous preview option that you should take advantage of. As long as you are an Amazon Associate, each book detail page will give you a way to either embed or share a link to a preview of your book.
Go to your book’s detail page on Amazon. Over on the right side, there are some social media icons that you can use to share the page. After the last symbol, you’ll see <Embed>. Click on that.
A pop-up window will open. Here your Amazon Associate ID and Tracking number will appear. You’ll want to double check those because any book purchased through the preview option earns you a commission. You use either the link or click on the embed option.
The embed option gives you code that you can insert in the text (HTML) section of your book’s landing page on your website. You did set up a website and create a landing page right?
For some reason you aren’t able to embed the code, there is still a way to add the preview link to the landing page. Upload the cover of your book and under Display Settings choose Link to: Custom URL. Here you can add the LINK (not the embed code) to the image. Make sure you caption the image letting people know that it is clickable and will provide a preview of the book.
The preview can be accessed through any Kindle device or anyone with the Kindle reading app on any device.
At the end of the sample, readers are encouraged to purchase the book on Amazon. There’s a good chance that if they made it that far, they’ll be interested in buying!
Assignment: Embed the preview on your book’s landing page. Share the preview link wherever you want.
Goodreads is another great place to get book reviews. Once your book is available on Amazon, you can create a Goodreads Author page and add it to the millions of books on that site. Amazon owns Goodreads, so book reviews on any of Amazon’s international sites will appear on Goodreads too.
Another nice option is the Goodreads widget you can add to your author blog or website. You can also add your blog feed to your Goodreads Author page for even more exposure. You can interact with readers through question and answer forum. You can run giveaways on your books. You can even advertise your book on Goodreads. Woot!
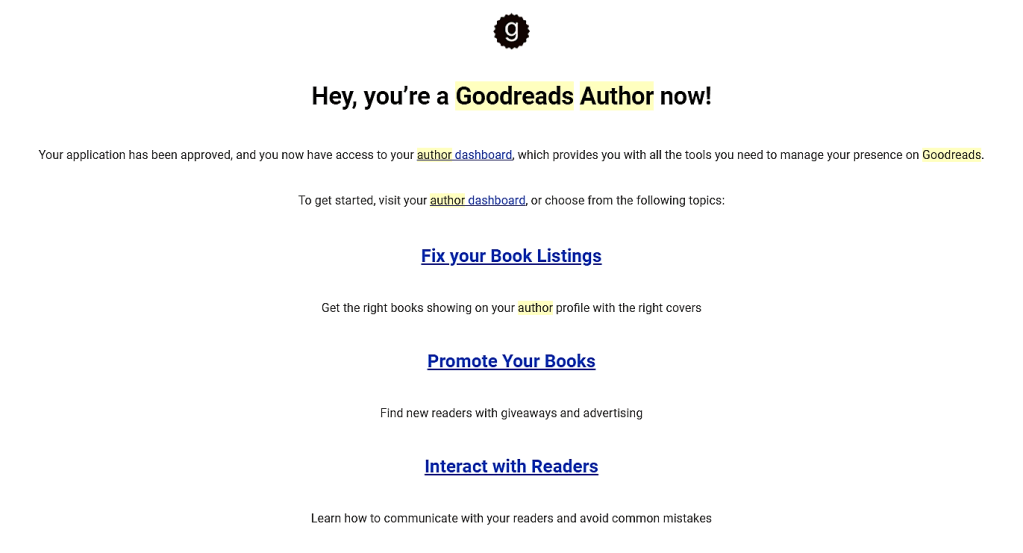
To set up your Goodreads Author page you first must apply for the Author Program. Sign in to Goodreads or create an account if you don’t already have one.
Then search for your book using the ISBN, ASIN or title. Click on the book and then on the author name.
At the bottom of your author profile page you’ll see “Is this you? Let us know!” to complete and submit an application for the Author program.
Once you’re approved, you’ll get an email welcoming you to the program.
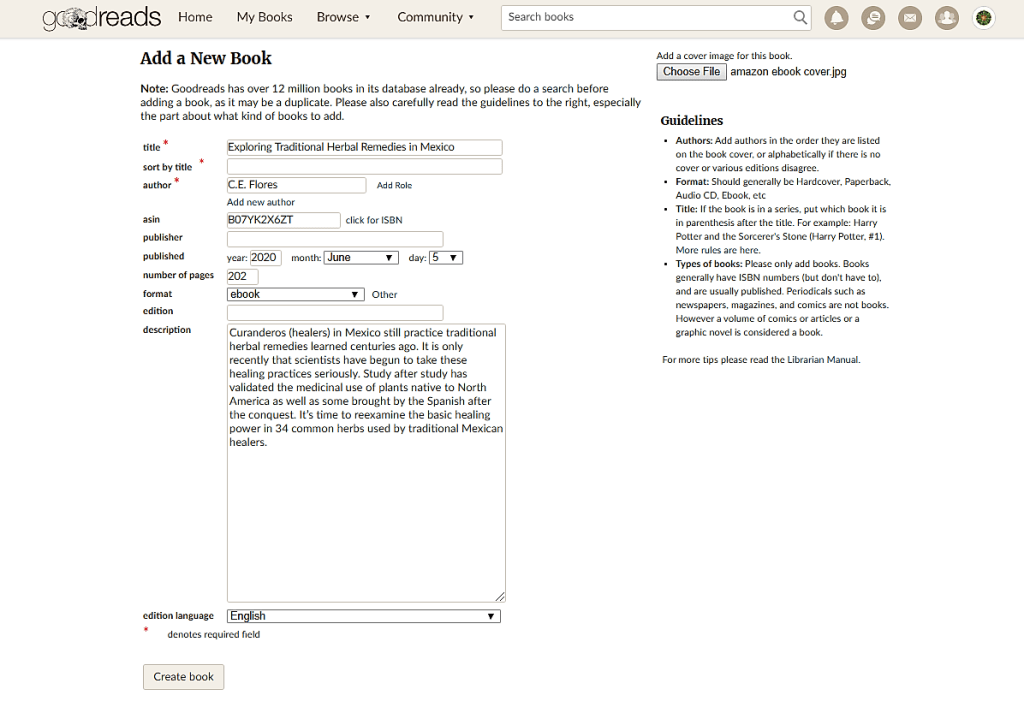
Next you’ll want to get your book listed on your author dashboard. Add your book using ASIN, ISBN or title to search for it.
Fill out the missing information which you can find on your book’s detail page on Amazon. Add a cover image. Submit.
Goodreads will verify it and voila, you have a book listing! Be sure to add each edition, paperback and ebook, so that readers of both types will see your book on Goodreads and leave a review.
Experiment with the different tools that Goodreads offers. Set up a giveaway. Answer some reader questions. Add some friends. Join some groups. Participate in discussions. Add your reading lists. Write some reviews. Have fun!