Blog to Book Project — Permissions or Credits

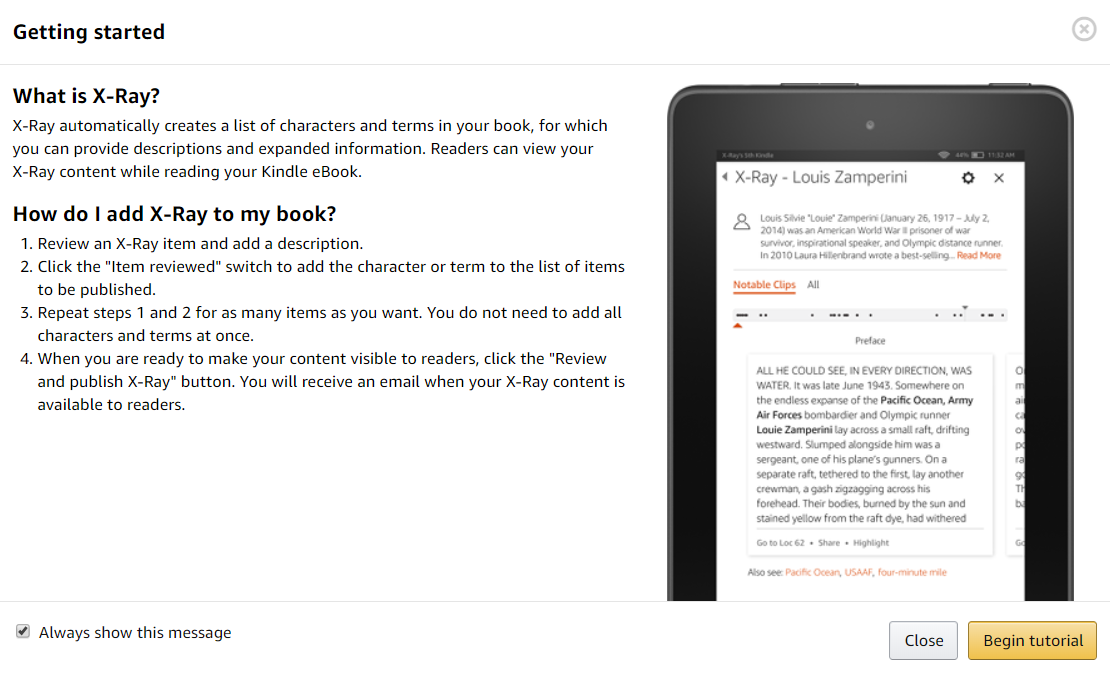
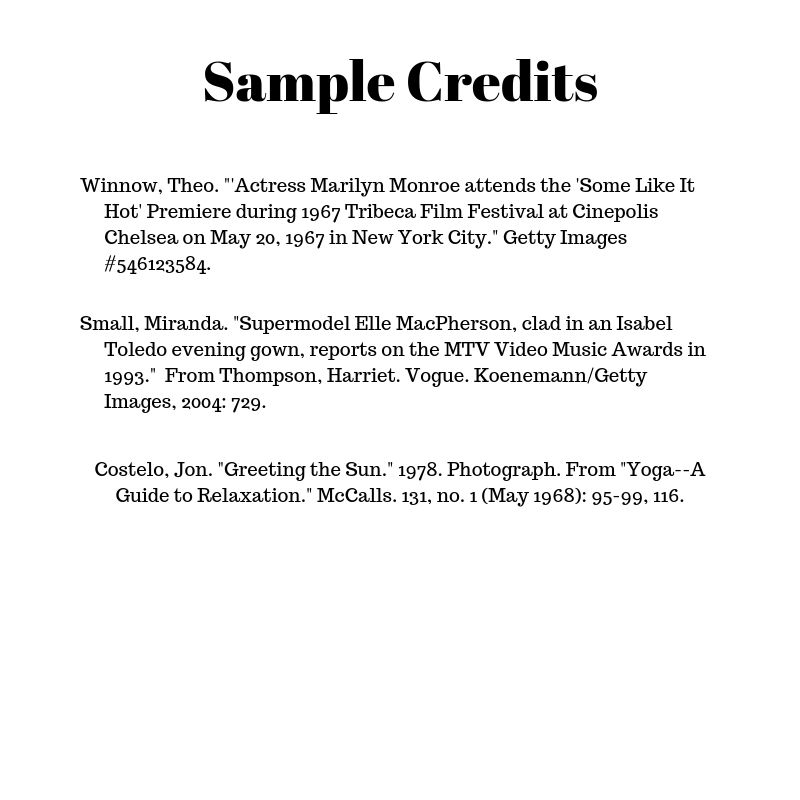
If you needed to get permission to include song lyrics, poems, images, quotations or even entire chapters, this is the section where an author gives credit where credit is due. Format the permission list in either MLA or APA style with the addition of what image or information is being referenced. Credits can be listed in alphabetical order or in order of appearance. 

Works that are classified as public domain do not need permission to be reprinted. Examples of public domain material include general information, materials created and published by the U.S. government, expired copyrighted material or those that never had copyright. 

You should assume that any work published in the United States first published after 1923 has a current copyright. 

Prior to publication, you should have already obtained permission from the copyright holder by sending that person or company a written request for permission to reprint that material. You can usually find the owner and where to contact that person or company in the copyright notice section. 

When you ask permission, you need to be specific about which rights you need and where the work will be reproduced. Consider:  

  • Are you requesting exclusive rights to reproduce the creative work?
  • How long are your requesting permission to use it?
  • Is there a territory limitation?
  • Is the copyright owner asking for monetary recompense for its use?

Exclusive rights mean that the creative work under discussion is only to be used by you in your book. Non-exclusive rights allow the copyright owner to grant permission for use to other individuals or companies. 

Permission can be granted for a limited time or for all perpetuity. Be clear on how long you expect to require permission to use the copyrighted item.

Sometimes permission can only be granted within certain geographic regions. Be sure to be specific where the image will be reproduced. 

Often the copyright owner will request payment for use. The final amount may be negotiable. As a self-published author, you will have to decide how much you are willing to pay for the privilege. 

If this seems like too much work, then simply don’t use copyrighted material. Instead, use your own work. If you need an image for your cover, design it yourself using a photo or formats found on Canva. Or you can use work that is available under the Creative Commons license which is free for public use.

Assignment: Verify that you do not need any permissions for any image or text in your book. If you do, set about obtaining the required permission.

Blog to Book Project — X-ray

Kindle ebooks have this neat little feature called X-ray. When you press and hold a highlighted word or phrase, the x-ray will pop up with more information about characters, topics, events or places.

Amazon has already taken the liberty of making the connection between certain phrases, events and names and Wikipedia.  All you have to do is approved the ones you want or replace the ones you don’t with your own juicy morsels.

In order to enable X-ray, you need to choose it from the options hidden in the ellipses on your bookshelf.

Then you’ll get a message asking if you want to enable x-ray for that particular book.

When the Wikipedia links are ready for review, you’ll receive an email.

Now the ellipses will list Launch x-ray as an option.

From there, you’ll be sent to the online reviewer. There’s even a tutorial to help you out.

When I added it to A to Z Reasons Why La Yacata is the Place to Be in Any Disaster: A Prepper’s Guide to Mexico, the terms apocalypse, Prepper, and zombie were chosen along with a slew of place names and historical personages as well as any references to ancient indigenous gods.

For the most part, I linked up to the appropriate entry at Wikipedia. However, for places like La Yacata that have no wiki page, I added my own definition.

After you review and submit the terms, you’ll get an email letting you know that the feature was enabled for that book. It’sthat easy and it adds value to the reader’s experience.

Assignment: X-ray your book!

Blog to Book Project — When you know better, do better

Today we are going to take a break from the technical stuff and talk about motivation. Believe me, we all need a bit of a boost in that department every so often.

Take that time when KDP rejected my upload for image formatting issues for the 5th time. Or when my first Amazon review of my latest book was only 2 stars. Man, that was a sad moment.

There’s definitely a learning curve to turning your blog into a book. You will make mistakes. A lot of mistakes. And then you’ll figure out how to do it right and make fewer mistakes. Let’s look at my two examples above and see what I learned.

I like to include images in my books. I think it adds to the content. I didn’t know, but I do now, that it works best when I insert the picture I want to use into a template Canva has available, then upload that image to the book. It gives me a standard size image that is consistent throughout my book and guess what? No more formatting errors! In fact, my latest book was image formatting error-free the very first upload.

Now let’s look at the 2-star review. The reviewer mentioned 3 points, that my ebook had links that made reading difficult, that it did not have an index and that there were many typos. Two of those three points were completely valid. I had rushed publishing so that it would be ready for the new year and well, didn’t think some things through.

Currently, I am in the process of hyperlinking the text rather than including the full link in the ebook. Then I am also adding an index. I honestly hadn’t thought to include one, but I think it will be valuable for this particular book. Thirdly, no there were no typos. See, the reviewer was from the UK and as I write in American English, well, yes there are some differences in spelling, but they weren’t typos.

Once my hyperlinking and indexing are done, I’ll be able to upload a new manuscript to Amazon and everyone who has purchased it already will get the new version. So now that I know better, I’ll do better. And so will you.

Blog to Book Project — Table of Contents

The table of contents is a vital section in the front matter of your book. You may also hear this section simply called Contents or abbreviated as TOC. In a digital book, the table of contents lists the chapters which are hyperlinked to the corresponding area of the book.

In a print book, the table of contents has the page number on which each chapter begins listed after the chapter title. When there is significant space between the chapter title and the page number, there may be leaders, usually in the form of dots, that connect the two components. Sometimes the page number is on the left before the chapter title.

Chapters are sometimes grouped into sections, which are also listed in the table of contents. If the book has several authors, each responsible for a chapter or story in the book, the authors’ name also appear in the table of contents.

Any front matter before the table of contents is not listed on the table of contents but is included in the page count. All back matter sections are included on the table of contents. The TOC should begin on a right hand page unless it is exactly two pages. In that case, it should start on the left side.

Creating a Contents page is not necessarily difficult. If you use a template like Pressbooks, your exported book will already have a hyperlinked or paginated table of contents. Kindle Create will also format it for you.

You can find step-by-step instructions to create a TOC in Word and Google Docs as well. If you’d like to be a bit more creative, Canva has table of contents templates you can edit and download as an image to include in your book.

Blog to Book Project — Royalties

As a published author, you will receive royalties on the books that are sold. Exciting, isn’t it?

Since I am most familiar with Amazon’s policies, we will be talking about royalty earnings through Amazon rather than other self-publishing sites today.

Amazon’s KDP lets you choose whether you wish to earn 70% royalties or 35% royalties on your ebooks. It seems like you would always want to choose the higher royalty rate, but there are some restrictions on eligibility.  

These eligibility requirements vary from country to country. If you are selling on the Amazon mega-platform (United States) then your book qualifies for 35% royalty sharing if it is priced at least 99 cents and less than 3 megabytes, if your book is between 3 megabytes but less than 10 megabytes and costs $1.99 or if your book is larger than 10 megabytes with a price of at least $2.99.

To quality for 70% royalty sharing your book must be priced between $2.99 and $9.99 and at least 20% less than the lowest cost of the book in printed form.

If you enroll your book in KDP select, you will earn 70% royalties on books sold in Brazil, Japan, India and Mexico as well. Enrollment also means your book is in the Kindle Unlimited (KU) and Kindle Owners’ Lending Library (KOLL) and you earn royalties based on how many pages are read. We’ll talk more about KDP Select on another day.

KDP will pay you 60% royalty rate of the list price on your paperback book. The cost of printing is deducted from that royalty. What is left over is all yours. If your book is sold through expanded distribution sites via Amazon, you will receive 40% royalty of the list price minus printing costs.

You can elect to receive your royalties by direct deposit or check. There is a minimum payment threshold with check payments. Direct deposit payments are made 60 days after the end of the month your book earned royalties.

Royalties are subject to withholding tax the amount of which depends on your nationality and in which country the book was sold. If you are a U.S. citizen, you will receive a 1099 MISC at the end of the year for tax purposes.

Blog to Book Project — Quotes

There certainly is a time and place for quotes in your blog to book project.

An epigraph is a short quotation, proverb, or poem that suggests the theme of the book which is part of the front matter.

Sometimes the title of a book comes from the epigraph. Sections can be introduced with poignant quotes. A collection of short stories might have an epigraph for each one.

Quotes are often taken from famous literature, Shakespeare, the bible, the poems of Edgar Allan Poe, and so on. The goal is to pique the reader’s interest. It could be done with humor or as foreshadowing.

So many amazing things have already been written that there is bound to be a quote out there that is exactly right for your book. Your job is to find it.

Assignment:

Find an epigraph for your blog to book project.

Blog to Book Project — Pressbooks

It’s time to share another writing tool! I know many authors utilize Word to craft their books then download a pdf file to upload to Amazon and voila but when I have attempted that process you wouldn’t believe the number of formatting errors that what to my wondering eyes did appear.

I was sure there had to be a better way. So I did a general search with my trusty friend Google and was nearly instantaneously presented with a list of book template sites. For whatever reason, I went with Pressbooks run by Book Oven Inc. Maybe I thought the idea of a book oven was cute. I can’t remember exactly what prompted me back then, but whatever the reason might have been, Pressbooks is now my book template of choice.

You can use the Pressbooks platform for free, which certainly fits a struggling author’s budget. When you are ready to upgrade there is a one-time fee of $19.99 per book to remove the Pressbook advertising from the EPUB and MOBI files. These files can then be uploaded to KDP, Kobo, Smashwords or any other publishing site.

If your book file (including images) is more than 25 MB, then you can upgrade again. You’ll get up to 250 MB of storage space and the PDF version of your book will also be advertisement free. I’ve only had to purchase the pro version once out of 9 books I have published. I’ve found that 25 MB gives you a whole lot of text and space for a few images to boot.

Pressbooks has made all of my blog to book projects so much easier. It takes just a minute or two to set up a new book. My catalog lists all the books I’m working on in one place. All my sections and chapters are easily arranged and rearranged. The front and back matter are appropriately formatted and numbered. There is even a glossary function that hyperlinks the word and sets up the glossary.

I can change the font and chapter introduction by selecting a new theme design. Automatically everything in the book is formatted to match the chosen theme.  If I don’t like the look of it, then I can change it again.

Setting up the copyright page is extremely simple. It is then inserted exactly where it should be in the text. There is even a cover generator, although I prefer the KDP cover generator.

I can view my book online similar to the KDP previewer. In this mode I can check my book for excessive white space, blank pages or awkwardly positioned images.

When I’m completely satisfied, I export the file and download it to my computer. Then I can upload it to the publishing site (I use KDP). If there are issues with image size or other problems with the text arrangement, I can edit the file on Pressbooks and export it again.

I can make sections of the book public and send readers to read sample chapters. Or I can make the entire book public online and ask Beta readers for their input.

So, to make your blog to book project that much easier, I suggest looking into a book template site like Pressbooks.

Assignment:

Check out different book template sites including Pressbooks.  

Blog to Book Project — Organize

While organization seems like a given, it actually can be quite tricky. There are so many rabbits holes you can fall down that before you know it, your blog to book project has been in the works six months or more with no end in sight.

Now, everyone will do things just a bit differently and that’s fine, but I’ll go through my general organization process when I am working on a blog to book project to show you what I mean.

  1. Decide on a theme for your blog to book project. (Example: Herbal Remedies in Mexico).
  2. Go through your blog posts and cull all posts that have something to do with the said theme. (Found 16 blog posts).
  3. Create a new book in Pressbooks and come up with a catchy title. (New book: Exploring Mexican Herbal Remedies) NOTE: We will talk about Pressbooks tomorrow.
  4. Copy and paste each post into a chapter in Pressbooks.
  5. Determine how many more chapters would make a decent size book. (I think 10 more chapters would be good).
  6. Write those and post them to your blog staggering the publication dates.
  7. Add the posts to your book.
  8. Move the hyperlinks to the endnotes or appendix.
  9. Rearrange, remove or reformat any images.
  10. Edit individual chapters.
  11. Write the introduction.
  12. Write a conclusion.
  13. Add the author page, acknowledgments, dedication, foreword, preface, or epigraph if applicable.
  14. Choose a copyright license.
  15. Add cover image.
  16. Check your book in Pressbooks viewer for formatting errors.
  17. Export.
  18. Download.
  19. Upload to the publishing site. (I use KDP)
  20. Check your book in KDP viewer for formatting errors.
  21. Fix errors. Export again. Download again. Upload again.
  22. Publish.

Of course, your work as an author is not finished by a long shot. You still have to get people to actually buy and read your book. So marketing would be another organizational aspect that we won’t get into just yet.

Assignment:

Make an ordered list for your blog to book project.

Blog to Book Project — Numbering Pages

Numbering the pages in the book is not as easy as 1, 2, 3 unfortunately, unless you are creating an ebook. Then there are no page numbers! An electronic book (ebook) is designed to be fluid text to accommodate different ereaders. So if you are only making an ebook, then numbering pages is a no-brainer.

However, if you are creating a print edition of your blog to book project, then let’s break it down.  

Front matter uses lower-case Roman numerals (xi, v, i ). If you remember, front matter includes Title Page, Copyright Page, Dedication, Acknowledgments, Table of Contents, Foreword, Prologue, Epigraph, and Reviews. Page numbers are only visible on these pages Acknowledgments, Dedication, Table of Contents, Foreword,  Prologue, Reviews even though all of the sections of the front matter are included in the page count.

Pages on the left side should have even numbers. Pages on the right should be odd-numbered. Page numbering always begins on the right. Your book should end on an even numbered page, even if that means adding a blank page or end sheet at the end. The title page and any blank pages do not have page numbers although they are included in the count.

If you have different sections, the page count continues but the page number is not shown on the section page. Everything after the front matter uses Arabic numbers (1, 2, 3) as a numbering system.

You can position your page numbers in the header or footer of your margins. Header page numbers are 0.125 inches above the text and often have a running header. Page numbers have left alignment on the pages on the left and right alignment on the right-hand pages. Footer page numbers are centered 0.125 inches below the text.

Assignment:

Check your numbering in your blog to book draft. Are all sections of the front matter numbered using lowercase Roman numerals? Does your first page number begin on the right?